12.1 Overview of custom controls
User controls are customized and reusable controls in the ASP.NET application. If the controls present in the list of the server controls do not meet the requirements of the applications, create a custom control.
The custom controls are compiled code making it easier to use in an application. They are difficult to create as compared to the Web server controls. When the control is created, user can add it to the Toolbox of the Visual Studio application. User can access all the properties associated with the new custom control. Only a single copy of the control is required in the global assembly cache of the application. They provide a dynamic layout for the developer while creating the controls.
Custom controls are deployed as assemblies in the application. They are compiled as dynamic link libraries (DLL) and used by the user.
12.2 Creating user control
The steps to create a custom control are as follows:
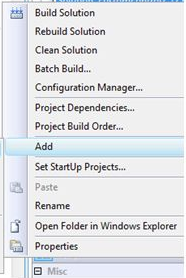
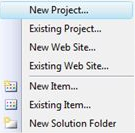
1) In the File menu, Click ‘New Project’ option from the list.
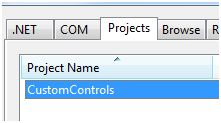
2) Select the project types, click either Visual Basic projects or Visual C# projects
3) Code for the control in the code behind file for the application
4) Add the namespace and an assembly information to the AssemblyInfo.cs file
5) Insert the assembly at the end of the page as shown below:
[assembly]: TagPrefix(“namespace” , controlid) ]
6) Build the project and it will show success message
7) Open a new file in the project and name it as ASP.NET website

8) Right click on the solution explorer and add existing project to it
9) Right click on the website project and add a reference
10) After the reference is added, add the control to the toolbox
11) Right click on the toolbox control and select choose item
12) Add the component in the .NET component window
13) The control will be added in the toolbox in the application
14) Drag and drop in the application and execute the application
12.3 Adding properties to the user control
Property helps user to access or add values to the user control in as application. The get and set attributes are used for data manipulation. A code sample for creating property in a custom control is as shown below:
public virtual string name
{
  get
  {
    return name1;
  }
  set
  {
    name1=value;
  }
}
User can set the attributes to the property of the custom control. Some of the list of the properties is as listed below:
1)Bindable: It is used to display a data binding dialog box for the property
2)Browsable: It allows the user to block the property from appearing it in the Property window
3)Default value: It allows the user to give default value for the property
4)Category:It allows to group the properties in a specific format. The properties will appear in the window
5) Description: It describes the property for the control used. In the property window the description for the control is displayed
6) Editor: It is used to specify the custom editor window for the property.
7) EditorBrowsable: It blocks the property to be displayed in the intellisense
User can set the attributes to the control class in an application. Some of the attributes are as listed below:
1)DefaultEvent: It is used to specify the default event for a control
2)DefaultProperty: It is used to specify the default property for a control
3)ToolBoxData: It allows to specify any tags added to the markup of the control
4)ToolBoxItem: It blocks the control from appearing in the toolbox
5) TagPrefix: It manages the HTML markup for the tag registration for the control
12.4 Adding events to the user control
Events are used for defining actions to be performed when the control in an application is executed. The events in the user control also perform the similar functionality. The steps to create an event in the user control is as mentioned below:
1) Create a user control page in the application
2) Add the action to be performed when the control is executed in the control definition
3) Navigate to the code behind file of the user control
4) Declare the event handler for the control in the file
5) Add the event actions in the code behind file of the user control application
6) Extract the values using the property in the application
A sample code for creating events in the user control is as shown below:
The code in the UserControl.ascx page is as shown below:
<%@ Control Language=”C#” AutoEventWireup=”true” CodeFile=”WebUserControl.ascx.cs” Inherits=”WebUserControl%>
Page Title:
<asp:TextBox id=”txt1” runat=”server”>
    </asp:TextBox>
<asp:Button ID=”btn1” runat=”server” Text=”update” onclick=”btn1_Click: />
The code behind file of the user control containing the event declaration is as shown below:
public partial class WebUserControl : System.Web.UI.UserControl
{
  private string pageTitle;
  public event EventHandler PageTitleUpdated;
  protected void Page_Load(object sender, EventArgs e)
  {
  }
  protected void btn1_Click(object sender, EventArgs e)
  {
    this.pageTitle=txt1.Text;
    if( PageTitleUpdates!=null)
    PageTitleUpdated(this, EventArgs.Empty);
  }
  public string PageTitle
  {
    get { return pageTitle; }
  }
}
The code for the web page into which the user control is added is as shown below:
<%@Page Language=”C#” AutoEventWireup=”true” CodeFile=”Default.aspx.cs” Inherits=”Default” %>
<%@Register Src=~/WebUserControl.ascx” TagName=”WebUserControl” TagPrefix=”uc1” %>
<! DOCTYPE html PUBLIC “-//W3C//DTD XHTML 1.0 Transitional//EN” >
<html xmlns=”http://www.w3.org/1999/xhtml”>
 <head runat=”server”>
   <title></title>
 </head>
 <body>
   <form id=”form1” runat=”server”>
     <div>
       <uc1:WebUserControl ID=”MyUserControl” runat=”server” OnPageTitleUpdate”MyEventUserControl_PageTitleUpdated” />
     </div>
   </form>
 </body>
</html>
The code behind file for the above web page is as shown below:
public partial class _Default: System.Web.UI.Page
{
   protected void Page_Load(object sender, EventArgs e)
   {
   }
   protected void MyEventUserControl_PageTitleUpdated(object sender, EventArgs e)
   {
     this.Title=MyUserControl.PageTitle;
   }
}
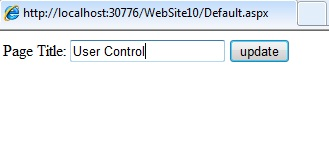
The output for the user control is as shown below:
12.5 Nested Master page with example
Master pages are used for creating a uniform view for all applications present in the solution. These master pages can be nested with one master page referencing another master page. They are used to create componentized master pages. Different site content pages can define their individual master pages.
A child master page has the file extension .master similar to all the master pages. These child master pages have content placeholders mapped to the parent master page. The child master page content placeholders are used for displaying content added in the child pages contents.
The advantage of using nested master pages is there is no limit on the creation of child masters. These child masters subordinate the design of the parent master. The overall design is defined in the parent master. The child page defines the body of the master page.
Consider two master pages as master ‘MasterPage.master’ and ‘MasterPage2.master’. The MasterPage2.master is the child of MasterPage.master.
A sample code for MasterPage.master containing two labels, two radio buttons and a textbox is as shown below:
<html xmlns=”http://www.w3.org/1999/xhtml”>
 <head runat=”server”>
  <style type=”text/css”>
   body
   {
     background-color:Aqua;
   }
  </style>
  <title></title>
  <asp:ContentPlaceHolder id=”head” runat=”server”>
  </asp:ContentPalceHolder>
 </head>
 <body>
   <form id=”form1” runat=”serve”>
     <div>
       <asp:Label ID=”label1” runat=”server” Text=”Name” ></asp:Label>
       <asp:TextBox ID=”txt1” runat=”server”></asp:TextBox>
       <br/>
     <asp:Label ID=”Label2” runat=”server” Text=”Gender”></asp:Label>
     <asp:RadioButton ID=”RadioButton1” runat=”server”/>Male
     </asp:RadioButton ID=”RadioButton2” runat=”server”/>Female
     </div>
   </form>
 </body>
</html>
A sample code for MasterPage2.master is as shown below:
<%@ Master Language=”C#” MasterPageFile=”~/MasterPage.master” AutoEventWireup=”true” CodeFile=”MasterPage2.master.cs” Inherits=”MasterPage2” %>

<asp:Content ID=”Content1” CotentPlaceHolderID=”head” runat=”server” >
    <asp:ContentPlaceHolder ID=”ContentPlaceHolder1” runat=”server”>
    <h1>Welcome User</h1>
    </asp:ContentPlaceHolder>
</asp:Content>
A sample code for content page Default.aspx id as shown below:
<%@ Page Title=” “ Language=”C#” MasterPageFile=”~/MasterPage.master” AutoEventWireup=”true” CodeFile=”Default.aspx.cs” Inherits=”_Default” %>
  <asp:Content=”Content1” ContentPlaceHolderID=”head” runat=”server”>
     First application for the user. Learn the concept of nested master page from this code
  </asp:Content>
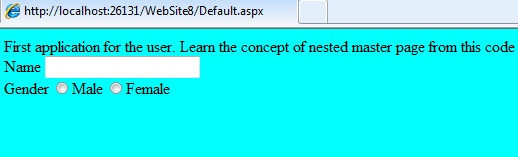
The output for the nested master page is as shown below: