6.1 CSS Introduction
CSS (Cascading Style Sheets) is used for defining styles to display the elements written in a markup language. It helps user separate the HTML or XHTML content from it style. The separation provides flexibility, faster accessibility to content, reduces complexity and repetition of data.
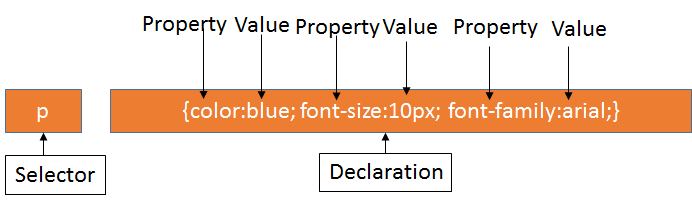
The syntax for CSS has two parts, a selector and one or more declarations. The selector contains HTML element for which the style is to added. The declaration contains property and a value associated with it. The pictorial representation of the syntax is shown below:
CSS comments: Comments are used for explaining codes. Comments are ignored by the browser for execution. The comments begin with ‘/*’ and ends with ‘*/’. A sample code after adding comments is shown below:
h1
{
    /* Set the font with the specified style*/
    text-font : arial;
    /*Set the background color*/
    color:red;
}
There are two types of style sheets declaration used for designing. The list of details are explained below:
- Internal Style Sheet
- External Style Sheet
- Inline Style Sheet
Internal Style Sheet: The style is defined in the <head> section of the web page using the <style> tag. The styles defined are limited to the particular web page in which it is declared. User must create a new style for every new page added in the document. Internal Styles are also known as ‘Embedded’ styles.
A code sample of internal style sheet is mentioned below:
<html xmlns=”http://www.w3.org/1999/xhtml”>
<head runat=”server”>
<title>First Web Page</title>
<style type=”text/css” >
h1 { color:Red}
p{ background:gray}
</style>
</head>
<body>
<form id=”form1” runat=”server”>
<div>
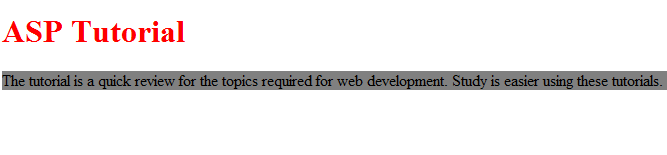
<h1>ASP Tutorial</h1>
<p>The tutorial is a quick review for the topics required for web development.</p>
</div>
</form>
</body>
</html>
The output after executing the code is shown below:
External Style Sheet: The styles created in an external style sheets can be reused by many applications. There is an external style page created and it can be linked to the web page. The external style sheet is a text file created with .css extension. The syntax to link the external style sheet to the web page is as shown below:
<head>
 <title>Web Creation</title>
 <link href=”name1.css” rel=”stylesheet” type=”text/css” >
</head>
 The code added in the CSS file is as shown below:
body
{
   Background-color:Aqua;
}
h1
{
   border :10pt, 5pt, 4pt, 4pt;
   background-color:Yellow;
}
p
{
    background-color:Green;
    border-style:dotted;
}
The code to link the CSS file with the web page is as shown below:
<html xmlns=”http://www.w3.org/1999/xhtml”>
 <head runat=”server”>
   <title>First Web Page</title>
   <link rel=”Stylesheet” type=”text/css” href=”StyleSheet1.css” />
 </head>
 <body>
    <form id=”form1” runat=”server” >
     <div>
      <h1>ASP Tutorial</h1>
       <p> The tutorial is a quick review for the topics required for web development. Study is easier using these tutorials</p>
     </div>
 </body>
</html>
 The output of the file when executed on the server is as shown below:


Inline Style Sheet: The Inline style sheets are used for adding style to the particular element in the web page. The inline style element is embedded directly in the html elements. The selector element is not required in Inline styles. An example of adding an Inline style in an html element is as mentioned below:
It is not efficient to use the Inline style for large codes as the style is limited for an individual element.
<p style=”font-family : arial; color:red; font-size:16px;”></p>
6.2 Use Themes to customize the site
Themes are used to apply consistent look to all the pages in a website. When the theme is set at the website level, all the controls and pages override theme. The steps to add a Theme in ASP.NET application are as follows:
1) Create a web application in Visual Studio application.
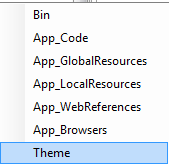
2) Open the Solution Explorer window, right click the project name and select ASP.NET folder.
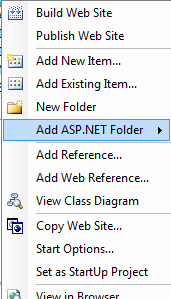

3) Select ‘Theme’ from the menu item list

4) The Add_Themes folder is created and rename the folder. The syntax to add theme to a web site is as mentioned below:
<configuration>
   <system.web>
     <pages theme=”ThemeName” />
   </system.web>
</configuration>
 6.3 Name skins within a Theme
The skin files are used for adding styles to the control in ASP.NET. The skin files are added in the Theme folder in the solution explorer. Every ASP.NET control has a unique SkinID attribute associated with it. The steps to add the skin file in application are as mentioned below:
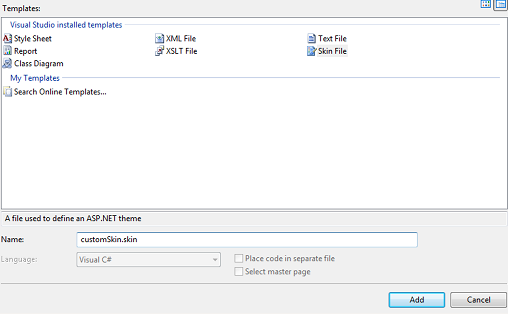
- In the Solution Explorer, right click to the theme folder and click ‘Add New Item’ option
- In the Add New Item dialog, click ‘Skin File’ option
- In the Name box, add a name for the .skin file and click ‘Add’
The screen shot to add a skin file in an ASP.NET application is as shown below:
 The code snippet for adding style through skin file is shown below:
<%--
Default skin template. The following skins are provided as examples only.

1.Named control skin. The SkinId should be uniquely defined because duplicate SkinId’s per control type are not allowed in the same theme.
<asp:GridVew runat=”server” SkinID=”gridviewSkin” BackColor=”White” >
    <AlternatingRowStyle BackColor=”Blue” />
</asp:GridView>
2: Default skin. The SkinId is not defined. Only one default control skin per control type is allowed in the same theme.

--%>
<asp:Image runat=”server” ForeColor=”Red” SkinId=”lblRed” />
The code for adding skinID attribute in the source code is as shown below:
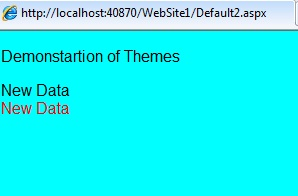
<%@ Page Theme=”mytheme” Language=”C#” AutoEventWireup=”true” CodeFile=”Default2.aspx.cs” %>
<!DOCTYPE html PUBLIC “-//W3C//DTD XHTML 1.0 Transitional//EN “ “http://www.w3.org/TR/xmtml1” >

<html xmlns=”http://www.w3.org/1999/xhtml” >
 <head runat=”server”>
    <title></title>
 </head>
 <body>
   <form id=”form1” runat=”server”>
    <div>
     <p>Demonstration of Themes</p>
     <asp:Label ID=”lblmessage” runat=”server” Text=”New Data”></asp:Label><br/>
     <asp:Label ID=”Label1” runat=”server” Text=”New Data” SkinID=”lblRed”></asp:Label>
    </div>
   </form>
 </body>
</html>

The output of the code sample is shown below:
6.4 Contents of Theme and Skin
Theme can be used as a style sheet in a web page. User can add theme as style sheet theme by adding a styleSheetTheme attribute in the Web.config file on the application. The syntax of adding theme as style sheet is as shown below:
<configuration>
 <system.web>
    <pages styleSheetName=”ThemeName” />
 </system.web>
</configuration>
Themes can be applied to an individual page in the application. User can set the Theme or StyleSheetTheme attribute of the @Page directive to the name of the theme.
<%@ Page Theme=”ThemeName” %>
<%@ Page StyleSheetTheme=”ThemeName” %>
Themes can be disabled for a page in ASP.NET. The EnableTheming attribute of the @Page directive to false. The syntax to enable theme is as shown below:
<%@Page EnableTheming=”false” %>
Themes can be disabled for a specific control by setting the value of the control. The syntax to disable the Theme is as shown below:
<asp:Button id=”Button1” runat=”server” EnableTheming=”false” />
User can create global theme that can be applied to all websites on a server. The steps to create a global theme are as follows:
1) Create the Themes folder in the following path:
%windows%\Microsoft.NET\Framework\version\ASP.NETClienyFiles\Themes
2) Add the files to the folder containing style sheets and images that can be applied globally
3) Run the command ‘aspnet_regiis –c’ to install the theme on the server running IIS
4) If the user is testing the theme on FTP web site, the theme folder can be manually created in the following path:
IISRootWeb\aspnet_client\system_web\version\Themes
Named Skins: Skins without SkinID are called default skin. The skins with an ID are known as named skin. Server control with unique ID can have different layouts defined for them. They can be defined in same file or different files depending on the requirement. SkinID can be used as reference to call the named skin. An example of named skin is as shown below:
<asp:Label runat=”server” Fore-color=”red” SkinID=”LabelHeader” />
<asp:Label runat=”server” Fore-color=”Blue” SkinID=”LabelFooter” />
An example to demonstrate referencing of named skin through ID is shown below:
<asp:Label id=”Header” runat=”server” SkinID=”LabelHeader” />
<asp:Label id=”Header” runat=”server” SkinID=”LabelFooter” />
The skin files can be automatically registered in the application. User must set the attribute named EnableEmbeddedSkins to true and the Skin property is set to built-in skin. The control will be automatically registered to the CSS file.
6.5 Apply Themes and Profiles
ASP.NET profiles are used to store information with an individual user in persistent format. The profile can be defined in web.config or machine.config file for the application. The data is not lost even when the session is expired or closed. Profiles are strongly typed and provide an intelliSense for development process.
The <profile> section is the base object for developing profiles. The <profile> section is part of the <system.web> file. The <profile> section includes the provider information. The <properties> section include the provider information. The default value for property is System.string.
The list of the attributes used for profile generation are as follows:
Attribute | Description |
allowAnonymous | It is used for storing values for anonymous users. By default the value is false |
customProviderData | It contains initialization of data for custom profile provider |
defaultValue | It is used for indicating default value for the property |
name | It is used to indicate the name of the property. It is a mandatory value |
provider | It is used to indicate the name of the provider for reading and writing values for the profile properties |
readOnly | It is used for the property value |
serialzeAs | It indicates to serialize the value for the property |
type | It indicates the type of the property |
The code sample below indicates the profile used in the application.
<profile>
 <properties>
    <add name=”Grader” allowAnonymous=”true” />
    <add name=”Section” allowAnonymous=”true” />
 </properties>
</profile>
Profile Groups: User can create profile by grouping properties. It is easier to simulate multiple profiles for an application. The code sample for creating profile groups is mentioned below:
<profile>
 <properties>
   <group name=”Books”>
    <add name=”Fiction” />
    <add name=”Creativity” />
   </group>
   <group name=”Publications>
    <add name=”Branch” />
    <add name=”city” />
   </group>
 </properties>
</profile>

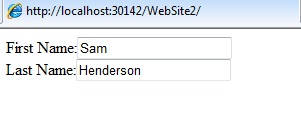
The code sample for creating profile in ASP.NET is as shown below:
<html xmlns=”http://www.w3.org/1999/xhtml” >
 <head runat=”server” >
    <title></title>
 </head>
 <body>
    <form id=”form1” runat=”server”>
     <div>
     First Name:<asp:TextBox ID=”TextBox1” runat=”server”></asp:TextBox><br/>
     Last Name:<asp:TextBox ID=”TextBox2” runat=”server”></asp:TextBox><br/>
     <br/>
     </div>
    </form>
 </body>
</html>
The code in the web.config file for the application is as shown below:
<?xml version=”1.0”?>
<!—
   For more information on how to configure your ASP.NET application, please visit
   http://go.microsoft.com/fwlink/?LinkId=169433
-->
<configuration>
  <system.web>
    <compilation debug=”true” targetFrameowork=”4.0” />
    <authentication mode=”Forms” />
    <profile>
       <properties>
      <add name=”FirstName” defualtValue=”Sam” />
      <add name=”LastName” defualtValue=”Henderson” />
       </properties>
    </profile>
  </system.web>
</configuration>
The action to be performed is written in the code behind file of the application is shown below:
public partial class _Default : System.Web.UI.Page
{
  protected void Page_Load( object sender, EventArgs e)
  {
    if(!IsPostBack)
    {
      this.TextBox1.Text = Profile.FirstName;
      this.TextBox2.Text = Profile.LastName;
    }
  }
}
The output of the code when executed on the server is shown below: