13.1 Static Members
Every class in ASP.NET is instantiated to create new objects related to it. Sometimes, user might create a class without instantiating it or a class needs to be used without creating an object for it. Static classes are created and do not require to be instantiated. The variables of a static class remain constant.
A class can be created as static and it can contain static members in it. The main features of the static class are as follows:
- It contains only the static members
- The static class cannot be instantiated
- It is a sealed class and it cannot be inherited by other classes in an application
- It cannot contain Instance constructors in it
A sample code for the static class with static members is as shown below:
public static class Square
{
  public static int CalculateArea( int side)
  {
    return side*side;
  }
}
In the code sample mentioned above, the class Square and its member both are static. To call the method, user must use the class name as the object in an application.
A sample code for calling the static method for the Square class is as shown below:
Console.WriteLine(“The area is:”+Square.CalculateArea(5));
13.2 View State
View State is used by the ASP.NET page framework for preserving the information between the postbacks occurred in the application. The web application is stateless in nature. Every time the page is created, the request is sent to the server. When the information is sent to the server, it is lost after each round trip. To preserve this information, view state is used in an application.
The features provided by the view state is as shown below:
1) It is used to keep the values between postbacks without using a session object or a user profile.
2) It can store the value of the page or the controls defined by the user
3) It can create custom view state provider allowing the user to store the information in the SQL Server database or different data storage
4) It is easy to implement the view state in an application.
The view state can be enabled at page level and at control level in an application.
The syntax to enable view state at page level is as shown below:
![]()
The EnableViewState property of the page is set to true, allowing the page to use the view state.
The syntax to disable the view state at page level is as shown below:
![]()
The EnableViewState property of the page is set to false, allowing the page to disable the view state.
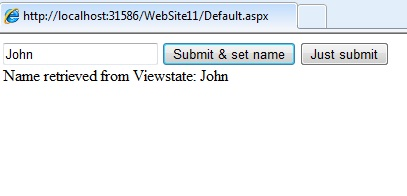
A sample code for the use of View State is as shown below:
<html xmlns=”http://www.w3.org/1999/xhtml”>
 <head runat=”server”>
    <title></title>
 </head>
 <body>
   <form id=”form1” runat=”server”>
     <div>
    <asp:TextBox ID=”namefield” runat=”server”></asp:TextBox>
        <asp:Button ID=”SubmitForm” runat=”server” Text=”Submit & set name” onclick=”SubmitForm_Click” />
        <asp:Button ID=”refreshpage” runat=”server” Text=”Just submit” /><br/>
        Name retrieved from ViewState:
        <asp:Label ID=”Label1” runat=”server” Text=”NameLabel”></asp:Label>
     </div>
   </form>
 </body>
</html>
The code behind file of the application contains the following code:
public partial class _Default: System.Web.UI.Page
{
   protected void Page_Load(object sender, EventArgs e)
   {
      if( ViewState[“NumberOfUser”]!=null)

      Label1.Text=ViewState[“NameofUser”].ToString();
      Label1.Text=”No user is assigned”;
   }
   protected void SubmitForm_Click ( object sender, EventArgs e)
   {
       ViewState[“NameOfUser”] = namefield.Text;
       Label1.Text=namefield.Text;
   }
}
The output is:
13.3 Hidden Field in Form
The hidden field is used to store information in the hidden field control. The hidden field control stores a single variable in its Value property. The control is not rendered in the web browser. User can set its properties similar to the standard ASP.NET control. It is used a repository for storing the page information.
The advantages of using the Hidden Field control are as follows:
- The hidden field is stored and read from the page
- All the browsers and client devices support forms that contain hidden fields
- The hidden field controls are present in the control list and no programming logic is required for implementation
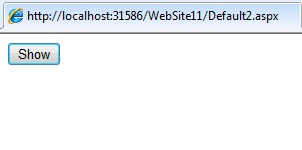
A sample code for the hidden field in a form is as shown below:
<html xmlns=”http://www.w3.org/1999/xhtml”>
 <head runat=”server”>
    <title></title>
 </head>
 <body>
    <form id=”form1” runat=”server”>
       <div>
         <asp:Button ID=”Button1” runat=”server” Text=”Show” onclick=”Button1_Click” />
         <asp:HiddenField ID=”HiddenField1” runat=”server” Value=”Welcome User”/>
       </div>
    </form>
 </body>
</html>
The code behind file for the hidden field is as shown below:
public partial class Default2: System.Web.UI.Page
{
    protected void Page_Load(object sender, EventArgs e)
    {
    }
    protected void Button1_Click( object sender, EventArgs e)
    {
    Server.Transfer(“Default3.aspx”);
    }
}
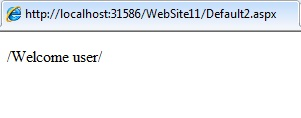
Consider another page as Defualt3.aspx used for retrieving the hidden field control. The code is as shown below:
public partial class Default3: System.Web.UI.Page
{
  protected void Page_Load( object sender, EventArgs e)
  {
    Page originalPage=(Page)Context.Handler;
    HiddenField hf = (HidderField)originalPage.FindControl(“HiddenField1”);
    Response.Write(“/”+hf.Value+”/”);
  }
}
The output is:
13.4 Query Field
A query string is used for appending the information at the end of the URL. They provide easy but limited way to maintain the state information. It is easy to transfer information from one page to another. The advantages of using query string are as follows:
1) They are light weighted state mechanism passed in the HTTP request that target a specific URL.
2) All the browsers and client devices support the query strings
3) When a user wants to pass limited information between pages, query string is useful
4) It is used for passing hashed session value between pages.
A sample code to demonstrate query string is as shown below:
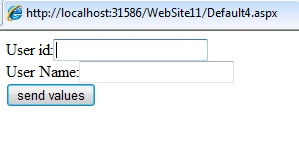
<html xmlns=”http://www.w3.org/1999/xhtml”>
 <head runat=”server”>
    <title></title>
 </head>
 <body>
    <form id=”form1” runat=”server”>
       <div>
     User id:<asp:TextBox ID=”txt1” runat=”server”></asp:TextBox>
     <br/>
     User Name:<asp:TextBox ID=”txt2” runat=”server”></asp:TextBox><br/>
     <asp:Button ID=”btn1” runat=”server” Text=”send values” onclick=”btn1_Click” />
       </div>
    </form>
 </body>
</html>
The code behind file is as shown below:
public partial class Default4: System.Web.UI.Page
{
   protected void Page_Load( object sender, EventArgs e)
   {

   }
   protected void bn1_Click(object sender, EventArgs e)
   {
     Response.Redirect (“Default5.aspx?UserID=”txt1.Text+&Username=”+txt2.Text);
   }
}
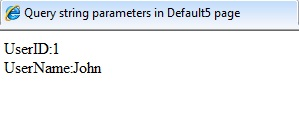
Create another web page as Default5.aspx. The code in the page is as shown below:
<html xmlns=”http://www.w3.org/1999/xhtml”>
 <head runat=”server”>
    <title>Query string parameters in Default5 page</title>
 </head>
 <body>
   <form id=”form1” runat=”server”>
    <div>
      User id:<asp:Label ID=”Label1” runat=”server” Text=”UserID”></asp:Label>
      <br/>
      User Name:<asp:Label ID=”Label2” runat=”server” Text=”UserName” ></asp:Label>
    </div>
   </form>
 </body>
</html>
The code behind file is as shown below:
public partial class Defult5:System.Web.UI.Page
{
  protected void Page_Load( object sender, EventArgs e)
  {
     if(!PostBack)
     {
       Label1.Text=Request.QueryString[“UserID”];
       Label2.Text=Request.QueryString[“UserName”];
     }
  }
}
Output is:
The query string values are transferred through URL. The image of the URL is as shown below:
![]()
13.5 Http Context
Http Context object is used to encapsulate details specific to the HTTP Request. The properties of the Http Context class includes Request, Response, Session object. A sample code for the Http Context is as shown below:
private void Page_Load(object sender, System.EventArgs e)
{
  Context.Items[“MyObject”] = new object();
  object o = Context.Items[“MyObject”];
}
Another example of Http Context using Response object is as shown below:
public class ResContext : System.Web.UI.Page
{
  private void Page_Load( object sender, System.EventArgs e)
  {
    class1 c = new class1();
    c.ShowResp();
  }
}
class class1
{
   public void ShowResp()
   {
     HtttpContext.Current.Response.Write(“calling class1”);
   }
}
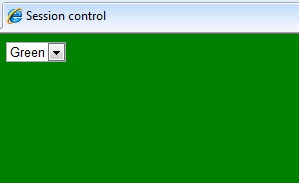
13.6 Session state
Session state allows user to store and retrieve values for an application. The session is enabled by default by all the applications. The variables can be set and retrieved using the Session property. The session variables are stored in SessionStateItemsCollection.
The advantages of the session state are as shown below:
- It is easy to be implemented in all applications
- It ensures durability and retains data during the application process
- It ensures the scalability of platform in an application
The example of the session state is as shown below:
<html xmlns=”http://www.w3.org/1999/xhtml”>
 <head runat=”server”>
   <title>Session control</title>
 </head>
 <body runat=”server” id=”BodyTag”>
    <form id=”form1” runat=”server”>
      <div>
    <asp:DropDownList ID=”DropDownList1” runat=”server” AutoPostBack=”true” onselectedindexchanged=”DropDownList1_SelectedIndexChanged”>
    <asp:ListItem Selected=”True” >Red</asp:ListItem>
    <asp:ListItem>Blue</asp:ListItem>
    <asp:ListItem>Green</asp:ListItem>
    </asp:DropDownList>
      </div>
    </form>
 </body>
</html>
The code behind file is as shown below:
public partial class Defualt6: System.Web.UI.Page
{
  protected void Page_Load(object sender, EventArgs e)
  {
    if ( Session[“BackgroundColor”]!=null)
    {
          DropDownList1.SelectedValue = Session[“BackgroundColor”].ToString();
      BodyTag.Style[“Background-Color”]=DropDownList1.SelectedValue;
    }
  }
  protected void DropDownList1_SelectedIndexChanged(object sender, EventArgs e)
  {
    BodyTag.Style[“Background-Color”]=DropDownList1.SelectedValue;
    Session[“BackgroundColor”] = DropDownList1.SelectedValue;
  }
}
Output is:
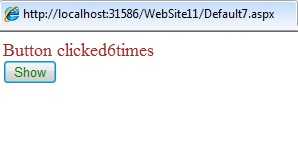
13.7 Application state
Application state is used as a data repository for all the classes in an ASP.NET application. It is stored in the memory of the server. It is faster in accessing information stored in a database. The application state is stored in the HttpApplicationState class. It contains a key-value pair of objects stored in it.
The advantages of the application state are as follows:
- Multiple user can access the application variable
- The Lock and Unlock method allows to remove the deadlock in an application
- The memory for the application object is released as soon as the object is deleted from the system.
A sample code for the application state is as shown below:
<html xmlns=”http://www.w3.org/1999/xhtml”>
 <head runat=”server”>
  <title></title>
 </head>
 <body>
   <form id=”form1” runat=”server”>
     <div>
    <asp:Label ID=”Label1” runat=”server” Text=”Label” Font-Size=”Large” ForeColor=”Brown” ></asp:Label>
    <asp:Button ID=”Button1” runat=”server” Text=”Show” onclick=”Button1_Click” ForeColor=”Green” />
     </div>
   </form>
 </body>
</html>
The code behind file is as shown below:
public partial class Default7: System.Web.UI.Page
{
   protected void Page_Load( object sender, EventArgs e)
   {
   }
   protected void Button1_Click( object sender, EventArgs e)
   {
    int counter=0;
    if(Application[“ButtonClickCounter”]=counter
    {
           counter=(int)Application[“ButtonClickCounter”];
    }
       counter++;
       Application[“ButtonClickCounter”]=counter;
       Label1.Text=”Button clicked” + counter.ToString()+”times”;
   }
}
Output is:
13.8 Cookie state
A cookie is a small data stored in a text file on the client system or in memory of the client browser session. The cookies can be temporary or permanent. The browser sends back the information from the server along with the page output. The server can read and extract the cookie values.
The advantages of the cookie state are as follows:
- It is simple and easy to implement
- It is the responsibility of the browser to send the data
- If there are multiple sites with cookies, the browser arranges them automatically.
A sample code for the cookie state is as shown below:
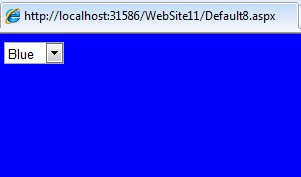
<html xmlns=”http://www.w3.org/1999/xhtml”>
 <head runat=”server”>
    <title>Session control</title>
 </head>
 <body runat=”server” id=”bodyTag”>
    <form id=”form1” runat=”server”>
      <div>
     <asp:DropDownList ID=”DropDownList1” runat=”server” AutoPostBack=”true” onselectedindexchanged=”DropDownList1_SelectedIndexChanged”>
     <asp:ListItem>White</asp:ListItem>
     <asp:ListItem>Red</asp:ListItem>
     <asp:ListItem>Green</asp:ListItem>
     <asp:ListItem>Blue</asp:ListItem>
     </asp:DropDownList>
      </div>
    </form>
 </body>
</html>
The code behind file is as shown below:
public partial class Default8: System.Web.UI.Page
{
  protected void Page_Load(object sender, EventArgs e)
  {
    if ( Request.Cookies[“BakcgroundColor”]!=null)
    {
    DropDownList1.SelectedValue=Request.Cookies[“BackgroundColor”].Value;
    bodytag.Style[“Bakcground-Color”]=DropDownList1.SelectedValue;
    }
   }
  protected void DropDownList1_SelectedIndexChanged( object sender, EventArgs e)
  {
     bodytag.Style[“Bakcground-Color”] = DropDownList1.SelectedValue;
     HttpCookie cookie = new HttpCookie(“Backgroundcolor”);
     cookie.Value=DropDownList1.SelectedValue;
     cookie.Expires = DateTime.Now.AddHours(1);
     Response.SetCookie(cookie);
  }
}
Output is: