5.1 Life cycle of ASP.NET page
The life cycle of the ASP.NET page specifies how the page is instantiated and processed to generate the specific output. There are different phases through which the page processing before rendering the output on web. The life cycle of the ASP.NET can be divided into two parts as follows:
- Application Life cycle
- Page Life cycle
1) Application Life cycle:
In the application life cycle, the event is raised by the application. User must create a file Global.asax in the root directory of the application. The Global.asax file is derived from HttpApplication class. The HttpApplication class processes one request at a time. The events in the Global.asax file are automatically bind by the ASP.NET application. There are several Application methods of Application. The description of these methods and events are mentioned below:
- Application_Start: The method is called only once during the life cycle of an application. The method is useful for performing tasks as loading data and initializing static values. The static data can be set only at the start of the application.
- Application_Error: The method can be used to raise during any phase of the application life cycle.
- Application_BeginRequest: The event is called when the exception is thrown. The event is called only when the first module raises an exception.
- Application_EndRequest: The event is raised for every request in the application. It is used to clean up the resources in the application.
- Init: It is called when all the modules for an application are created.
- Dispose: It is called for destroying the resources of the application. The method can manually release the resources.
- Application_End: The event is called once in the lifetime of the application. It is executed before the application is unloaded.
2) Page Life Cycle:
The ASP.NET page when executed goes through a life cycle performing the processing steps. The life cycle of the ASP.NET page is mentioned below:
- Page request: The page request occurs before the life cycle of the page executed. ASP.NET checks whether the page needs to be parsed or cached version to be sent to the user.
- Start: The page properties Request and Response values are set in the Start phase of the page. IsPostBack and UICulture property are set in the Start method.
- Initialization: In the Initialization phase, controls are available on the page. Every control has Unique ID property.
- Load: During the load phase, the request is post back and control properties are loaded with information.
- Rendering: The view state of the controls on the page is saved before rendering on the server. The page calls the Render method for every control.
- Unload: The event is raised after the control is completely rendered. The Request and Response properties are unloaded and cleanup is performed.
The life cycle of ASP.NET page is as below:
- PreInit: The event is raised before the start stage of the page is completed and the initialization phase has started.
- Init: The Init event is raised after all controls are initialized. It is used to read or initialize the properties of the control.
- InitComplete: The event is raised after all initialization stage of the page is completed. It is used to make changes to view state before post back occurs.
- PreLoad: The event is raised after the page loads view state for all controls.
- Load: The OnLoad method is called on the Page object. It is repeated for the child control present on the page.
- LoadComplete: The event is raised at the end of the event handling state.
- PreRender: It is raised after the Page object has created all controls. The PreRender event is raised for all controls and every child control on the page.
- SaveStateComplete: The event is raised after view state and control state are saved for the page.
- Render: The event is used to write the control markup to send to the browser.
- Unload: The event is raised for every control and for the page itself.
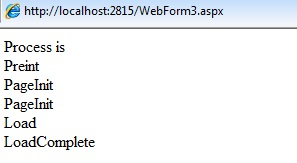
- The example of the Page life cycle and output is shown below:
namespace demo1
{
  public partial class WebForm3: System.Web.UI.Page
  {
    protected void Page.PreInit ( object sender, EventArgs e)
    {
           Lbl2.Text=Lbl2.Text + “<br/>” + “Preint”;
    }
    protected void Page.Init ( object sender, EventArgs e)
    {
       Lbl2.Text=Lbl2.Text + “<br/>” + “PageInit”;
    }
    protected void Page.InitComplete ( object sender, EventArgs e)
    {
       Lbl2.Text=Lbl2.Text + “<br/>” + “PageInit”;
    }
       protected void Page.OnPreLoad ( object sender, EventArgs e)
    {
       Lbl2.Text=Lbl2.Text + “<br/>” + “PreLoad”;
    }
    protected void Page.Load ( object sender, EventArgs e)
    {
       Lbl2.Text=Lbl2.Text + “<br/>” + “Load”;
    }
    protected void Page.LoadComplete ( object sender, EventArgs e)
    {
       Lbl2.Text=Lbl2.Text + “<br/>” + “LoadComplete”;
    }
    protected void Page.OnPreRender ( object sender, EventArgs e)
    {
       Lbl2.Text=Lbl2.Text + “<br/>” + “OnPreRender”;
    }
    protected void Page.OnSaveStateComplete ( object sender, EventArgs e)
    {
       Lbl2.Text=Lbl2.Text + “<br/>” + ”SaveStateComplete;
    }
    protected void Page.UnLoad ( object sender, EventArgs e)
    {
       Lbl2.Text=Lbl2.Text + “<br/>” + “Unload”;
    }
    }
}
The output of the code is as shown below:
5.2 State Management of the Control
When a new page is created and posted to the server, all the controls and information in the specific page is sent to the server. The information in the page is lost after the round trip of the page from the browser/client to the server.
There are several states used for preserving the page data during the execution of the round trip. The state management feature provides the user to preserve the control state. The list of state management control is as mentioned below:
- View State
- Control State
- Hidden Fields
- Cookies
- Query string
- Application state
- Session state
- Profile Properties
View State:
The view state property is used to retain the values between multiple page requests. It is the default method of the page. The control and page properties are preserved and restored for the user whenever required. Every control is encoded and sent to the server in an hidden field as ‘_VIEWSTATE’. It serializes the data for every control on the web page. It is not secure to store sensitive data in the View state. The code in the View state can be easily de-serialized. The encryption of the code can be maintained on the server side to ensure the security.
The View state can be enabled or disabled for the control or the page. To disable the View state of the control, set the ViewStateMode property of the control to disabled state. To disable the view state of the page, set the EnableViewState of the @Page directive to disabled.
A sample code for adding the attribute to the Page and Control is as mentioned below:
For Page Directive
<%@ Page Language=”C#” EnableViewState=”True” ViewStateMode=Disabled” ….%>
Code for Control
<asp:TextBox tunat=”server” ViewStateMode=”Enabled” ….. />
2. Control State:
In the Control State, the data of the control is stored. The Control state property allows the user to persist property information of the control. The ViewState property is turned off at the page level in View State of the control. However in Control state, the ViewState property is not turned off.
3. Hidden Fields:
The Hidden field control is used to store information that renders as an HTML hidden field on the server. It is used as storage for page information to be directly added to the page. The contents in the Hidden field can be easily modified by another user. Hence, sensitive information is avoided in the control. The content of the Hidden field are sent in the HTTP form collection. The hidden fields must be submitted using the HTTP POST method. The control holds a single value in the Value property.
4. Cookies:
Cookies are used to store data in a text file or in the system memory for the browser session. It contains the information of the web application when the user visits the site. Cookies can be temporary or persistent. The cookies are saved on the users system and can be sent to the server through the request information.
Cookies can be added using the Response object. The Response.Cookies collection is used or adding the cookie information. There are two ways to add cookies in the application.
A sample code for adding cookies is mentioned below:
Method 1:
Response.Cookies(“userName”).Value=”Sam”
Response.Cookies(“userName”).Expires = DateTime.Now.AddDays(2)
Method 2:
HttpCookie c1 = new HttpCookie ( “pagevisited”)
c1.Value = DateTime.Now.ToString
c1.Expires = DateTime.Now.AddDays(2)
Response.Cookies.Add(c1)
The Expires property informs the browser that the cookie will expire after the specified time in the parameter list. The expiration value cannot be retrieved back through the Request object.
The browser applies limitations to the cookies to be stored on the system. Depending on the browser, the cookie limitations are applied.
5. Query String:
The query string is the information appended at the end of the URL. An example of query string is as shown below:

In the URL path mentioned above, the query string starts with a question mark. It contains two attribute/value pairs in the link. One of the attribute is item and other is for cost. It is easy to pass information from one page to another through the query string object. The sensitive data cannot be sent through the query string as it is easy for another user to change the data.
The components mentioned below are server based state management controls.
6. Application State:
The application state is used for storing information that is shared among users. Application state is stored in Application key/value dictionary. ASP.NET provides three events for initialization of Application variable. The details of the variables is mentioned below:
- Application_Start: It is raised when the application starts. The application variables are places in this event.
- Application_End: It is raised when the application shuts down. It is used for releasing resources from the application.
- Application_Error: It is raised when an unhandled error occurs. The error logging is performed through this event.
The advantages of using the Application state are as follows:
- Simple implementation: Application state is user friendly, consistent with other .Net framework classes.
- Application scope: Only one copy of the information is saved for the complete application developed by the user.
The disadvantages of Application State are as mentioned below:
- Resource requirements: Server variables are required by the Application state. The server performance gets affected and the scalability of the application is poor.
- Limited durability of data: The Application state stored global data and it is volatile. The data can be affected if there are server crash, upgrade, or shutdown.
A sample code to add and retrieve data is mentioned below:
//Code to store information in application state
lock ( this )
{
    Application [“Name”] = “John”;
}

//code sample to retrieve data

lock ( this )
{
    String str1 = Application[“Name”].ToString();
}
7. Session State:
The Session state is used for storing values that will be visible across all the pages. The values are stored in the memory of Session state till they are explicitly removed or the Session gets expired. The data life of values stored in the Session state is limited and specified for the particular session.
The advantages of the Session state are as follows:
- Extensibility: The session state can be extended by creating a session state provider. The data can be stored in the custom format depending on the storage mechanism implemented.
- Cookieless support: Session state works with browsers that do not provide HTTP cookies.
- Platform scalability: Session state can be used in multi computer and multi process configurations.
- Data persistence: The data stored in the Session state can be persisted across multiple processes in the system.
- Session specific events: The Session management events can be raised and used by the application.
- Simple implementation: It is easy to use as the ASP developers find it similar to use.
The disadvantage of the Session state is its Performance considerations. The session state variables are in memory till they are removed or replaced by the user. The performance of the server is affected.
A sample code of the Session state is shown below:
//Code to store information in Session state
Session [ “Name” ] =”John”;
//code sample to retrieve data
string str1 = Session [ “Name” ];
8. Profile Properties:
Profile properties allows user to store specific data. The profile data is not lost even if the session expires. The data stored is persistent and associated with the user. The information can be easily managed without creating a new database.
The advantages of Profile Properties are as follows:
- Platform scalability: It can be used in multi computer and multi process configuration. It optimizes the scalability of the code.
- Data persistence: The data is preserved through IIS restarts and process restarts. The data is stored in external mechanism.
- Extensibility: User must configure a profile provider. The provider class stores the profile data.
The disadvantages of Profile Properties are as follows:
- Data maintenance: The data in profile properties needs to be maintained by the user. There are appropriate cleanup mechanisms provided by the profile properties to maintain data.
- Performance considerations: They are slower than session state as the data is stored in memory and is persisted in the data store.
- Additional configuration requirements: They require configuration for the use. The profile properties and profile provider must be configured by the user.
The syntax of Profile properties is mentioned below:
<profile>
<properties>
<add item = “item name” />
</properties>
</profile>
3.3 Controls raising events
Event are actions performed by the specific control in an application. Every ASP.NET control has an event associated with it. But when a user creates a control the event for the control needs to be explicitly defined. The steps for raising an event through the user control are as follows:
1) Drop a User Control into the .ascx page. Add the member variable to the container class by using the following code:
protected MyControl MyControl1;
where MyControl1 is the user control created by the user in the system.
2) Define an event in the control class of the application.
public Event MyEvent as System.EventHandler;
where MyEvent is the event created by the user. The event will perform the action depending on the control created by the user.
3) Raise the event in the function of the control class
RaiseEvent MyEvent (Me, New EventArgs())
where user raises an event for the control created.
4) Create a delegate for the event specified by the user
public delegate void delegate name( object sender, EventArgs e);
here the delegate acts as a pointer for the respective event raised by the user.
5) The method and delegate signature defined must be the same. Wire up the event with the delegate defined in the application.
protected MyControl1_MyEvent(object sender, System.EventHandler e) {}
More details regarding the topic will be discussed in later chapters.
3.4 Event Handling in Web Forms
Event handlers in ASP.NET take two parameters and return void data type. The syntax of the event in ASP.NET is as mentioned below:

where first parameter is the object raising event and the second parameter is the event argument.
There are events related to the page and control in ASP.NET. The list of the events is mentioned below:
Control events in ASP.NET
- Disposed: The event is raised when the control is released.
- DataBinding: The event is raised when a control binds to the data source
Page events in ASP.NET
- Init: The event is raised when the controls on the page are initialized.
- Load: The event is raised when the page is loaded in the system.
- Error: The event is raised when an unhandled exception is thrown.
- PreRender: The event is raised when the control is to be rendered.
- Unload: The event is raised when the control is unloaded from the page.
Default events in ASP.NET
Every control in ASP.NET has an event associated with it. The default event can be added in the application by double clicking on the control added in the design view of the page. The list of controls and default events associated with them are as follows:
Default Event | Controls |
Click | Button, BulletedList, HyperLink, ImageButton, ImageMap, LinkButton |
SelectedIndexChanged | CheckBoxList, DataGrid, DataList, DropDownList, ListBox, RadioButtonList |
CheckedChanged | CheckBox, RadioButton |
MenuItemClick | Menu |
SelectionChanged | Calendar |
AdRotator | AdCreated |
TextChanged | TextBox |
Events that cause the form to post back immediately to the server are called postback events. The server needs to give immediate response to the user for the event. Events that are not posted back immediately to the server are called non postback events. By setting the AutoPostBack property to true the events can be posted immediately to the server.
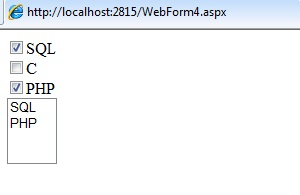
The example of checkbox control demonstrates the event handling in ASP.NET. The checkbox
control raises the Check Changed event by double clicking the control. The source code of the control is shown below:
<html xmlns=”http://www.w3.org/1999/xhtml”>
 <head runat=”server”>
  <title></title>
 </head>
 <body>
  <form id=”form1” runat=”server”>
    <div>
     <asp:CheckBoxID=”CheckBox1” runat=”server” Text=”SQL” AutoPostBack=”true” oncheckedchanged=”CheckBox1_CheckedChanged” />
    <br/>
    <asp:CheckBoxID=”CheckBox2” runat=”server” Text=”SQL” AutoPostBack=”true” oncheckedchanged=”CheckBox2_CheckedChanged” />
    <br/>
    <asp:CheckBoxID=”CheckBox3” runat=”server” Text=”SQL” AutoPostBack=”true” oncheckedchanged=”CheckBox3_CheckedChanged” />
    <br/>
    <asp:ListBox ID=”ListBox1” runat=”server” ></asp:ListIBox>
    </div>
  </form>
 </body>
</html>
In the code behind page, when the user selects value from the checkbox the value must be added to the List Box control. The code for the same is shown below:
protected void CheckBox1_CheckedChanged( object sender, EventArgs e )
{
  if ( CheckBox1.Checked == true )
  {
     ListBox1.Items.Add(CheckBox1.Text);
  }
}

protected void CheckBox2_CheckedChanged( object sender, EventArgs e )
{
   if ( CheckBox2.Checked == true )
   {
     ListBox1.Items.Add(CheckBox2.Text);
   }
}

protected void CheckBox3_CheckedChanged( object sender, EventArgs e )
{
   if ( CheckBox3.Checked == true )
   {
      ListBox1.Items.Add(CheckBox3.Text);
   }
}
The output of the code when executed on the server is shown below:
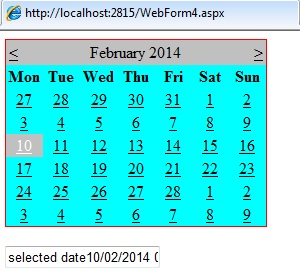
Another example of event handling is explained considering calendar control. The Selection Changed event is raised for the Calendar control. The source code of the control is shown below:
<html xmlns=”http://www.w3.org/1999/xhtml” >
 <head runat=”server”>
    <title></title>
 </head>
 <body>
   <form id=”form1” runat=”server”>
     <div>
    <asp:CalendarID=”Calendar1”runat=”server” onselectionchanged=”Calendar1_SelectionChanged” BackColor=”Aqua” BorderColor=”Red” >
    </asp:Calendar>
    <br/>
    <asp:TextBox ID=”TextBox1” runat=”server” ></asp:TextBox>
     </div>
   </form>
 </body>
</html>
The code behind file contains the code for entering the value in the textbox control after selecting it from the calendar control.
protected void Calendar1_SelectionChanged( object sender, EventArgs e)
{
   TextBox1.Text = “selected data”+Calendar1.SelectedDate;
}
The output of the code when executed by the system is shown below: