
Introduction:
- This chapter will introduce to a very new and useful module of Struts 2 web development. The topics like what is an interceptor, what is its use, how to create and use them in our web application, types of interceptors, advantages of interceptor etc.
What are interceptors and why to use them?
- Let’s assume that our web application is having a page for uploading a file. The file can be of any extension including audio file, video file, PDF file, or any file from Microsoft office tools.
- We are apparently going to keep some constraints for our uploading module. That is, if our website is for uploading student’s assignments, then the end user should not upload any audio or video files. Or say we want to keep size restrictions for uploading file. Or any other file processing is required prior to uploading file.
- Interceptors come in picture now. The main use of interceptors is to pre-process or post-process a module in a web-site. That is, any pre-processing that is required before the action tag is executed from struts.xml and any post-processing required after the action tag is executed from struts.xml is specified by the interceptors.
- Interceptors get executed before and after the action elements are called from struts.xml file.
- The main purpose of using interceptors is to provide file validation, as we have seen above, validation of fields in our web page, logging, storing, handling exceptions, setting timers (time-out for some event) etc.
- In nut-shell: Web-page restrictions and validations from user as well as server side can be provided by interceptors.
- Also, a web page can have multiple interceptors. That is, n number of validations (pre as well as post) can be applied to a web form for different fields.
Life-cycle of Struts web application with interceptors:
- When a client submits a form or requests for any resource from server, the request is given to the filters to verify which action should be executed based on which button is clicked.
- If the interceptor module is present in the “action” section, every interceptor is executed in a sequence first and then the request is transferred to action element.
- Based on the action class (.java file), success, error or failure is returned from the action class method and the required jsp file is given as a response to the user.
- Flow of program will be:
Client’s request -> filters -> interceptors -> action classes -> success/failure/error -> respective JSP
- If the interceptor module is not specified, the program is executed normally. That is,
Client’s request -> filters -> action classes -> success/failure/error -> respective JSP
- The life cycle of Struts 2 Framework with interceptors can be visualized as below:
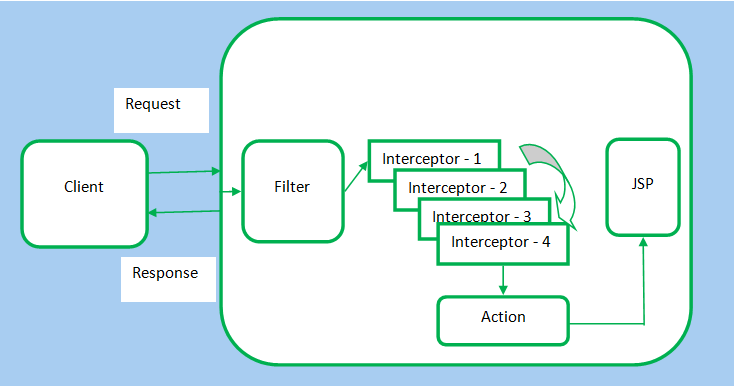
Figure: Struts 2 Web application flow using interceptors
How to use interceptors in Struts 2 Web application:
- Interceptors are predefined elements in Struts 2 framework. To use them, we have to provide <interceptor-ref> elements with specific attributes in action element (in package element) of struts.xml configuration file.
- Interceptors get executed pre form-processing or post form-processing from struts.xml file. When to execute and in which sequence is specified in struts.xml file.
- The general syntax of declaring interceptor is:
<interceptor-ref name = “Name of interceptor”>
<! -- optional parameters can be given as: -- >
     <param name = “parameter name” > values </param>
</interceptor-ref>
- For example, for there is a pre-defined interceptor for uploading any file on Apache server. This interceptor can be given as:
<interceptor-ref name = “fileUpload”>
</interceptor>
- Place the above statements in struts.xml as follows:
<package name = "default" namespace = "/" extends = "struts-default">
     <action name = "result" class = "action_class.myaction">

<! -- use of interceptor in struts.xml -- >
          <interceptor-ref name = "fileUpload">
         </interceptor>
         <result name = "success"> jsp/next.jsp </result>
     </action>
</package>
- As shown above, the interceptor is specified by <interceptor-ref> element. The name of interceptor is “fileUpload”. This name is pre-declared in Struts 2 framework .So it is case-sensitive and we cannot change it.
- The interceptor element is placed above the result element. So it gets executed first and if the file upload returns success, then the result.jsp page is displayed.
Types of interceptors in Struts 2:
- The types of interceptors in Struts 2 are:
- In-built
- Custom
- Inbuilt interceptors are predefined in struts configuration files. You just have to use it in action element when required. The types of inbuilt interceptors are:
- fileUpload
- execption
- alias
- checkbox
- chain
- datetime
- multiselect
- i18n
- params
- Validation
- conversionError
- workflow
- execAndWait
- Custom interceptors are to be declared first and then we can use them in our configuration files.
- All the interceptors with their complete description and use with program are illustrated in coming chapters.
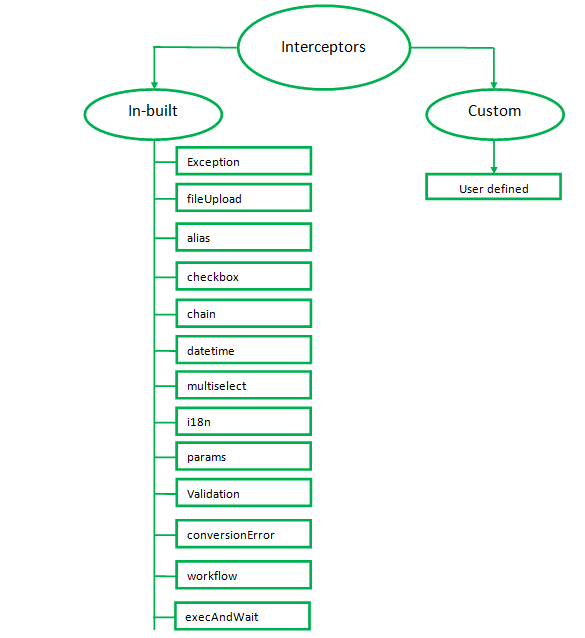
Figure: Struts 2 types of interceptors