
Introduction:
- We have already studied ValueStack very well in previous chapter. This chapter will introduce you to the ActionContext, OGNL and how the ValueStack and the ActionContext are related with each other. Also, how to use ActionContext objects and Expression Language in Struts 2 framework.
ActionContext:
- ActionContext is a set of objects or we call it as storage of the objects which are related to the current request-response of a web application.
- ActionContext is basically a container of objects which are created during a session, or application or locale etc during a complete client server interaction. These objects are stored in the ValueStack in a proper sequence (such as : Temporary Objects -> Model Object -> Action Object -> Named Object as described in our previous chapter).
- The ValueStack is actually a part of ActionContext along with other objects. That is, ActionContext consists of all the objects of ValueStack + other objects related to the current interaction of web application to the client.
- The ActionContext can be visualized as follows:
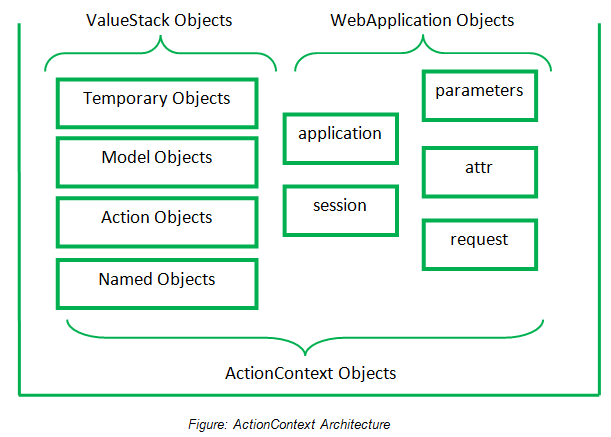
- The context map of ActionContext has following objects:
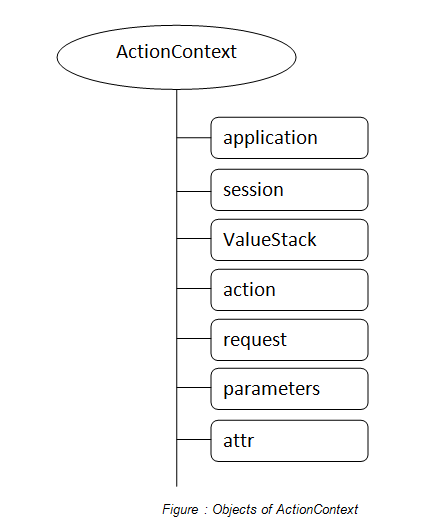
- Each of the object of ActionContext is created for specific purpose as follows:
Name of Object | |
1. parameters | Map of request parameters for this request (a map that contains all the HttpServletRequest parameters for the current the request) |
2. request | Map of request-scoped attributes (a map that contains all the HttpServletRequest attributes for the current the request) |
3. session | Map of session-scoped attributes (a map that contains all the HttpServletRequest attributes for the current the session) |
4. application | Map of application-scoped attributes (a map that contains all the ServletConfig attributes for the current the application) |
5. attr | Returns first occurrence of attribute occurring in page, request, session, or application scope, in that order |
6. ValueStack / root | Contains all the application-domain–specific data for the request |
Table: Objects of ActionContext with their purpose
- The objects stored in ActionContext are distinctive per context, which makes our ActionContext thread-safe. That is, the objects need not to be declared synchronized.
- The current ActionContext can be referred by calling getContext() method of ActionContext class. That is, to refer to the current ActionContext following method (a static factory method) is used:
ActionContext context = ActionContext.getContext();

// to access objects from ValueStack we should use:
ActionContext context = ActionContext.getContext().getValueStack();
ActionInvocation Interface:
- The ActionInvocation interface is used to access the objects associated with ActionContext, ActionProxy, ValueStack and Result.
- A reference variable of ActionInvocation Interface is to be created which can refer to AcitonContext or ValueStack objects and can access the related data.
- The ActionInvocation Interface has following methods to facilitate the access of objects data:
1. public ActionContext getInvocationContext() : returns the ActionContext object associated with the ActionInvocation
2. public ActionProxy getProxy() : returns the ActionProxy instance holding this ActionInvocation.
3. public ValueStack getStack() : returns the instance of ValueStack
4. public Action getAction() : returns the instance of Action associated with this ActionInvocation.
5. public void invoke() : invokes the next resource in processing this ActionInvocation
6. public Result getResult() : returns the instance of Result
Example for implementing ActionInvocation Interface:
- To implement and understand the methods of ActionInvocation interface, we first must create an action class (.java class) which implements this interface. And then, the methods can be defined and used in action class.
- In previous chapters, we already have seen the concepts of Interceptors, which are used to alter the work flow of a web application in Struts 2. Those Interceptors were of built-in type. But interceptors can be also classified as user-defined interceptors, which are also known as custom interceptors or even dynamic interceptors. And such interceptors can be given by using ActionInvocation Interface.
- As the custom interceptor do not have any idea of what is to be executed or which steps are to be followed for running the page, or what is to deployed first, we need to configure it in a proper manner.
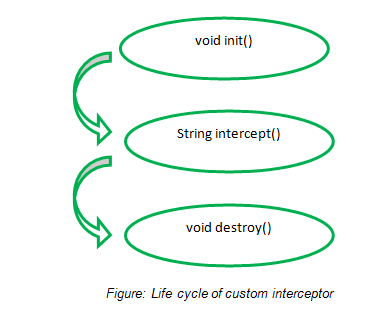
- The actual life cycle of a custom interceptor is:
- Initialization phase : init() method
- The init() method is invoked only once during the life cycle of a custom interceptor. The method is used to initialize the interceptor. It normally includes loading of any startup programs or names of JSP files. The return type of init() method is void.
- Service phase : intercept() method
- The intercept() method is executed or invoked at every request the user makes. It is like service() method of servlets wherein it will perform the tasks given by user (by following the action) and revert the results back in form of JSP pages.
- The return type of intercept() method is String and it returns “success” or “failure” or “none” as per the returned value of action invocation.
- End phase : destroy() method
- The destroy() method is again called only once in the life cycle of interceptor. It is generally used to free up the allocated resource by the interceptor. The return type of destroy() method is void.
- Initialization phase : init() method
- The life cycle of custom interceptor can be visualized in the figure following.
- The steps of creating custom interceptor are:
- Create a java class that implements Interceptor interface. The interceptor belongs to xwork2 package (com.opensymphony.xwork2.interceptor.Interceptor)
- Implement all the methods of Interceptor interface.
- Define the entry of this interceptor in configuration file, which is in struts.xml file.
Link it to the action class created.
- The steps with example are explained below:
- Step 1: Create a java class that implements Interceptor interface and
- Step 2: Implement all the methods of Interceptor interface
// myaction.java

/*
 * To change this license header, choose License Headers in Project Properties.
 * To change this template file, choose Tools | Templates
 * and open the template in the editor.
 */

package action_class;

import com.opensymphony.xwork2.ActionSupport;

/**
 *
 * @author Admin
 */

import com.opensymphony.xwork2.ActionInvocation;
import com.opensymphony.xwork2.interceptor.Interceptor;
import com.opensymphony.xwork2.util.ValueStack;

public class action_class implements Interceptor
{

   public void init()
    {
             System.out.println(“Init method called…. ”);
    }
    public String intercept(ActionInvocation ob) throws Exception
    {
        System.out.println(“Intercept method called…. ”);
           ValueStack stack=ob.getStack();
           String s=stack.findString("name");
           stack.set("name",”hello”+s);
           return ob.invoke();
     }
    public void destroy()
    {
             System.out.println(“Destroy method called…. ”);
    }
}
- Step 2: Define the entry of this interceptor in configuration file, which is in struts.xml file and
- Step 3: Link it to the action class created
// struts.xml

<?xml version = "1.0" encoding = "UTF-8" ?>

<!DOCTYPE struts PUBLIC "-//Apache Software Foundation//DTD Struts
Configuration 2.1//EN" "http://struts.apache.org/dtds/struts-2.1.dtd">
<struts>

    <package name = "myapplication" extends = "struts-default">

      <interceptors>
         <interceptor name = "new_interceptor" class = "action_class.MyInterceptor">
         </interceptor>
      </interceptors>

      <action name = "login" class = "action_class.Login">
        <interceptor-ref name = "new_interceptor"></interceptor-ref>
        <!—calling the custom interceptor -- >

        <result>welcome.jsp</result>
      </action>
    </package>
</struts>
- Now, the first.jsp will have only one textfield to retrieve the name of user and a button for action and redirection to the next page.
// first.jsp

<%@page contentType = "text/html" pageEncoding = "UTF-8"%>
<%@taglib prefix = "s" uri = "/struts-tags" %>

<!DOCTYPE html>
<html>
    <head>
        <meta http-equiv = "Content-Type" content = "text/html; charset = UTF-8">
        <title> Struts 2 Custom Interceptor Example  </title>
    </head>
    <body>
       <s:form action = "login">

       <s:label value = “Enter your name here: ” />

       <s:textfield name = "name" label = "Name"></s:textfield>
       <hr/>
       <s:submit value = "login"></s:submit>
       </s:form>
    </body>
</html>
- The next.jsp with “Hello Username!!” will be as follows:
<%@page contentType = "text/html" pageEncoding = "UTF-8"%>
<%@taglib prefix = "s" uri = "/struts-tags" %>

<!DOCTYPE html>
<html>
    <head>
        <meta http-equiv = "Content-Type" content = "text/html; charset = UTF-8">
        <title> Struts 2 Custom Interceptor Example  </title>
    </head>

    <body>
      Hello  <s:property value="name"/>  !!
      <hr/>
    </body>
</html>
- The action with getter and setter methods will be as follows:
// Login.java

/*
 * To change this license header, choose License Headers in Project Properties.
 * To change this template file, choose Tools | Templates
 * and open the template in the editor.
 */

package action_class;
import com.opensymphony.xwork2.ActionSupport;

/**
 *
 * @author Admin
 */

public class Login extends ActionSupport{
   private String name;

   public String getName()
   {
      return name;
   }
   public void setName(String name)
   {
     this.name = name;
   }
   public String execute()
   {
    return "success";
   }
}
- And lastly, our web.xml can be written as:
// web.xml
<?xml version = "1.0" encoding = "UTF-8"?>
<web-app version = "3.1" xmlns = "http://xmlns.jcp.org/xml/ns/javaee" xmlns:xsi = "http://www.w3.org/2001/XMLSchema-instance" xsi:schemaLocation = "http://xmlns.jcp.org/xml/ns/javaee http://xmlns.jcp.org/xml/ns/javaee/web-app_3_1.xsd">
    <filter>
        <filter-name> struts2 </filter-name>
        <filter-class> org.apache.struts2.dispatcher.FilterDispatcher </filter-class>
    </filter>
    <filter-mapping>
        <filter-name> struts2 </filter-name>
        <url-pattern> /* </url-pattern>
    </filter-mapping>
    <session-config>
        <session-timeout>
            30
        </session-timeout>
    </session-config>
    <welcome-file-list>
        <welcome-file> jsp/first.jsp </welcome-file>
    </welcome-file-list>
</web-app>