
Hello and welcome readers!! Hope you are enjoying the tutorials. Today our topic of discussion is Wi-Fi. As you all know, Wi-Fi stands for wireless fidelity. It is also a wireless technology and it is very famous among the young smartphone network. So let's explore this guy.
9.1 Introduction
Wi-Fi is a technology which permits us to exchange data or connect to internet wirelessly. Sounds good, isn’t it!! Yes, it does. We can connect to internet via the intelligent usage of microwaves. Many devices use Wi-Fi e.g., computers, mobile devices, etc. Wi-Fi is practically less secured as compared to wired connection. An intruder doesn’t have to break the physical security.
So let us talk about android. We have Wi-Fi P2P (peer-to-peer) networking allows devices to connect to each other. They should be equipped with proper hardware. With these APIs we can discover the nearby devices. Main constituents of wiFiP2P are as follows:
- There are methods which allow us to discover, request and connect to peers.
- Listeners notify about the success or failure of methods of WifiP2pmanager class
- Intents are there which notifies about the detection of particular events detected by Wi-Fi P2P framework.
Generally we create a broadcast receiver to receive intents broadcasted by android system.
WifiManager represents the Android Wi-Fi Connectivity service which can be used to configure network connections, manage current connections, and scan for access points and monitor changes. There are two specific permissions required to use Wi-Fi Manager and they are:
<uses-permission android:name=”android.permission.ACCESS_WIFI_STATE”/>
<uses-permission android:name=”android.permission.CHANGE_WIFI_STATE”/>
We have the following constants defined in our class:
- WIFI_STATE_CHANGED_ACTION: This indicates that the Wi-Fi hardware status has changed, moving between enabling, enabled, disabling, disabled, and unknown. It includes two extra values keyed and they are:
- EXTRA_WIFI_STATE: It provides new Wi-Fi states and
- EXTRA_PREVIOUS_STATE: it provides previous Wi-Fi states.
- SUPPLICANT_CONNECTION_CHANGE_ACTION: This Intent is broadcasted whenever the connection state with the active access point changes. It is fired when a new connection is established or an existing connection is lost.
- NETWORK_STATE_CHANGED_ACTION: It is fired whenever the Wi-Fi connectivity state changes. This Intent includes two extras:
- EXTRA_NETWORK_INFO: it includes a Network Info object that gives details about the current network state
- EXTRA_BSSID: It includes the BSSID of the access point to which we are connected.
- RSSI_CHANGED_ACTION: We can monitor the current signal strength of the connected Wi-Fi network. It is possible by listening for the RSSI_CHANGED_ACTION Intent. This Broadcast Intent includes an integer extra namely EXTRA_NEW_RSSI which holds the current signal strength. To use this signal strength, we need to use a method on the Wi-Fi Manager to convert it to an integer value on a scale of our choice.
We have a startScan method which is used to conduct a scan for access points. Asynchronously an intent with action namely SCAN_RESULTS_AVAILABLE_ACTION is broadcasted which announces about the completion of scan and the available results. We need to create and register a configuration when we need to connect to a Wi-Fi network. Network configurations are stored in WifiConfiguration object. Some of the publicly available fields are:
- BSSID: The BSSID for an access point.
- SSID: The SSID for a particular network.
- networkId: This is a unique identifier which is used for the identification of network configurations of current device.
- priority: This is used to order the list of potential access points which can be used for connection.
- status: It gives information about the current status of network connection.
Let us not complicate the things any more. We shall see a short example and you will have the idea about the usage of this API.
9.2 Example
Create a project and name it as you like. I am naming it WiFiExample app. It is a simple example application which will turn on and turn off Wi-Fi programmatically. It is small but informational. So as you always do, open your activity_main.xml file and code it as shown in the following listing:
<RelativeLayout xmlns:android="http://schemas.android.com/apk/res/android"
    xmlns:tools="http://schemas.android.com/tools"
    android:layout_width="match_parent"
    android:layout_height="match_parent"
    android:paddingBottom="@dimen/activity_vertical_margin"
    android:paddingLeft="@dimen/activity_horizontal_margin"
    android:paddingRight="@dimen/activity_horizontal_margin"
    android:paddingTop="@dimen/activity_vertical_margin"
    tools:context=".MainActivity" >
    <TextView
        android:layout_width="wrap_content"
        android:layout_height="wrap_content"
        android:text="Hello Readers!!" />
    <ToggleButton
        android:id="@+id/tbw"
        android:layout_width="wrap_content"
        android:layout_height="wrap_content"
        android:layout_alignLeft="@+id/imageView1"
        android:layout_alignParentTop="true"
        android:layout_marginLeft="46dp"
        android:layout_marginTop="40dp"
        android:text="ToggleButton"
        android:textOff="Wifi Off"
        android:textOn="Wifi On" />
    <ImageView
        android:id="@+id/imageView1"
        android:layout_width="wrap_content"
        android:layout_height="wrap_content"
        android:layout_below="@+id/tbw"
        android:layout_centerHorizontal="true"
        android:layout_marginTop="18dp"
        android:src="@drawable/ic_launcher" />
</RelativeLayout>
Figure activity_main.xml file
Graphical layout of application should be similar to the following snapshot:
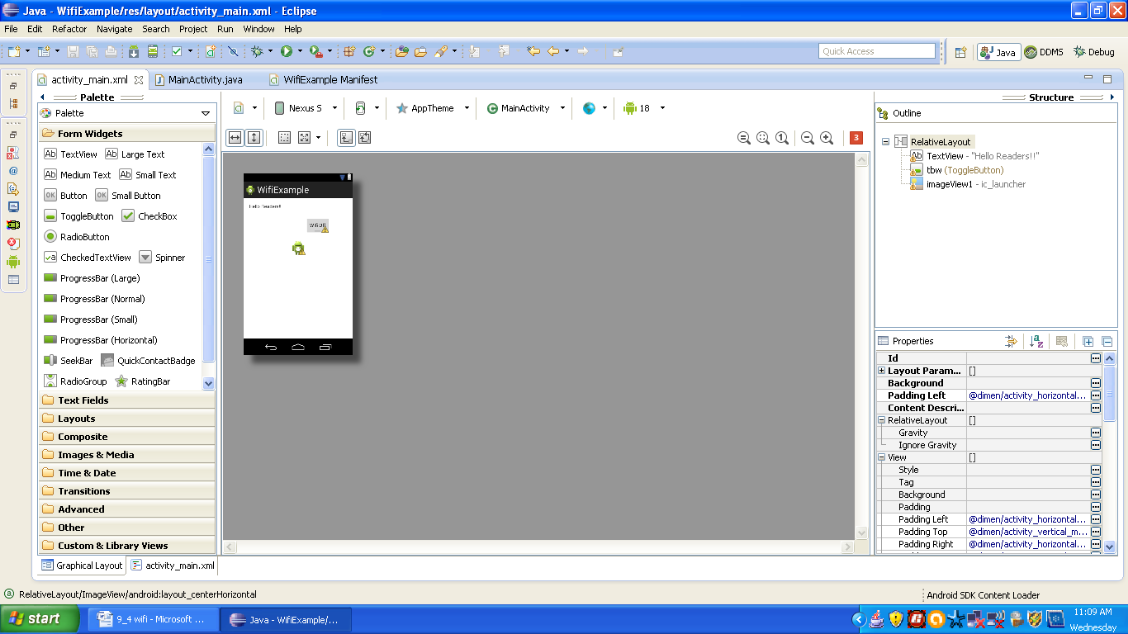
Figure Graphical layout of application
package com.android.tution.Wifi;
import android.net.wifi.WifiManager;
import android.os.Bundle;
import android.app.Activity;
import android.content.Context;
import android.view.Menu;
import android.view.View;
import android.view.View.OnClickListener;
import android.widget.ToggleButton;
public class MainActivity extends Activity implements OnClickListener {
    private ToggleButton tb;
    @Override
    protected void onCreate(Bundle savedInstanceState) {
        super.onCreate(savedInstanceState);
        setContentView(R.layout.activity_main);
        uI();
    }
    public void uI() {
        tb = (ToggleButton) findViewById(R.id.tbw);
        tb.setOnClickListener(this);
    }
    @Override
    public boolean onCreateOptionsMenu(Menu menu) {
        // Inflate the menu; this adds items to the action bar if it is present.
        getMenuInflater().inflate(R.menu.main, menu);
        return true;
    }
    @Override
    public void onClick(View arg0) {
        // TODO Auto-generated method stub
        if (arg0 == tb) {
            if ((tb.isChecked())) {
                try {
                    WifiManager wifiManager = (WifiManager) getBaseContext()
                            .getSystemService(Context.WIFI_SERVICE);
                    wifiManager.setWifiEnabled(true);
                } catch (Exception e) {
                }
            } else {
                try {
                    WifiManager wifiManager = (WifiManager) getBaseContext()
                            .getSystemService(Context.WIFI_SERVICE);
                    wifiManager.setWifiEnabled(false);
                } catch (Exception e) {
                }
            }
        } else {
    }
    }
}
Figure main activity class
Open the manifest file and code it as shown in the following listing:
<?xml version="1.0" encoding="utf-8"?>
<manifest xmlns:android="http://schemas.android.com/apk/res/android"
    package="com.android.tution.Wifi"
    android:versionCode="1"
    android:versionName="1.0" >
    <uses-sdk
        android:minSdkVersion="8"
        android:targetSdkVersion="18" />
    <uses-permission android:name="android.permission.CHANGE_WIFI_STATE" />
    <uses-permission android:name="android.permission.CHANGE_WIFI_MULTICAST_STATE" />
    <uses-permission android:name="android.permission.CHANGE_NETWORK_STATE" />
    <uses-permission android:name="android.permission.INTERNET" />
    <uses-permission android:name="android.permission.ACCESS_NETWORK_STATE" />
    <uses-permission android:name="android.permission.READ_PHONE_STATE" />
    <uses-permission android:name="android.permission.WRITE_EXTERNAL_STORAGE" />
    <application
        android:allowBackup="true"
        android:icon="@drawable/ic_launcher"
        android:label="@string/app_name"
        android:theme="@style/AppTheme" >
        <activity
            android:name="com.android.tution.Wifi.MainActivity"
            android:label="@string/app_name" >
            <intent-filter>
                <action android:name="android.intent.action.MAIN" />
                <category android:name="android.intent.category.LAUNCHER" />
            </intent-filter>
        </activity>
    </application>
</manifest>
Figure manifest file
So we are done with implementation part of our application. It is the high time to test our application. Either create a suitable emulator or run a suitable emulator on which you want to run your application. After the first run of application, your screen should look similar to the following snapshot:
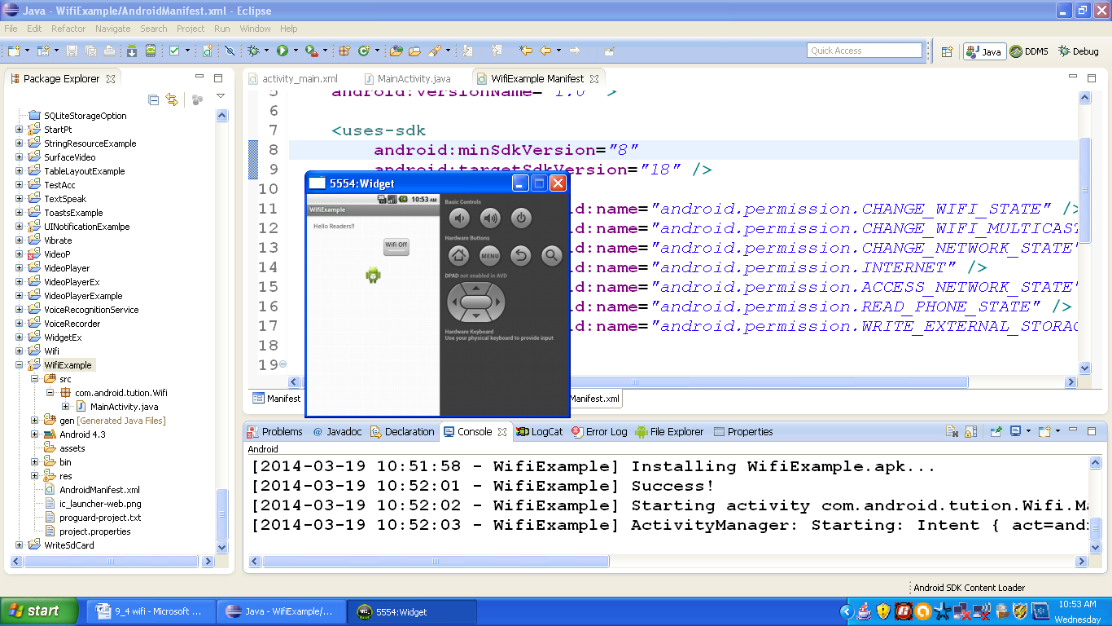
Figure Output after the first run of application
You can notice that the toggle button is turned off after the first run. We can turn on and turn off wifi by turning on and off this particular button respectively. Following snapshot highlights the turned on state of wi-fi.

Figure Wi-Fi is turned on
Let us turn off the button and see the output again. So the following snapshot shows the off state of Wi-Fi.

Figure Wi-Fi turned off
For your satisfaction about the working of application on device, we are showing you a sample output. In this we have pressed the toggle button to turn on the Wi-Fi.
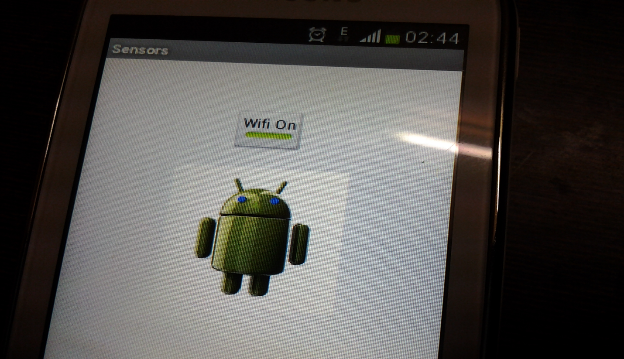
Figure Sample output of application tested on real device
The Wi-Fi was turned on. The output is shown below:

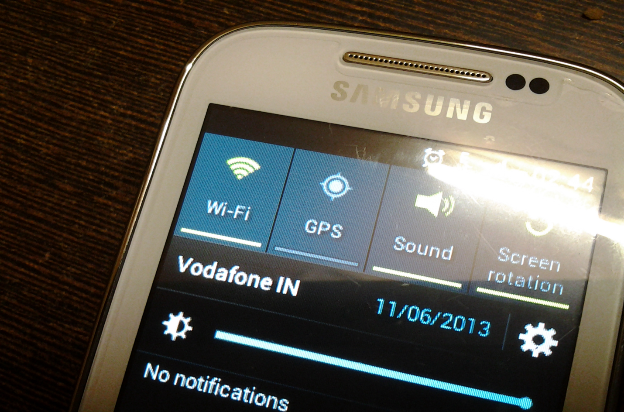
Figure Wi-Fi is turned on via the use of our app
Congratulations buddies!! We are done with this section. I hope this was a useful example for you. Looking forward to get compliments from youJ. See you in the next section. Till then keep practicing. Happy App developing!!!