
Android Loaders asynchronously load data from Activity or Fragment. They are used to load data in adapters. Loaders are used for loading data from databases or content providers. You can even create a static list also. This API is very important. It was introduced in Android 3.0 which corresponds to API 11.
There are many classes and interfaces which can be associated with Android loaders which are meant to be used in applications. All of these are not used in each and every Android application. But an instance of LoaderManager is required to initialize the loader and implementation of loader class like CursorLoader is essential to keep the thumbs up.
3.11.1 Implementing an Android Loader
Following are the steps required to implement loader and they are:
- We need an activity or a fragment.
- Instance of LoaderManager is required
- A subclass of Loader or AsyncTaskLoader is required to load data from some other source. Or a CursorLoader to load data which is supported by a Content Provider.
- Create a new loader. Manage the relationships with the existing loaders. This are performed by the implementation of LoaderManager.LoaderCallbacks.
- Display the data like an adapter to populate and display items.
- If we are using CursorLoader then a data source is required such as a content provider.
3.11.2 Important Classes/Interfaces/Methods
Let us get a small introduction to methods and interfaces used with loaders one-by-one.
1.LoaderManager: This is an abstract class. It is associated with an Activity or Fragment. It manages one or more loader instances. An activity or a fragment can have only one LoaderManager but a LoaderManager can house many loaders. With the help of LoaderManager, an application manages long running operations.
2.Loader: This is an abstract class. It loads data in asynchronous mode. Base class of a loader is this particular class. In the active state, loaders keep track of the source of data. If any content changes, they deliver the result. We can implement our own subclass.
3.LoaderManager. LoaderCallbacks: As the name suggests, it is used for callbacks. It is an interface. A client uses this interface to interact with the LoaderManager.
4.AsyncTaskLoader: This is an abstract loader. It houses an AsyncTask to do the work. AsyncTask stands for asynchronous task.
5.CursorLoader: This is a subclass of AsyncTaskLoader. It queries the ContentResolver and returns the cursor. Set of rule named as Loader is implemented by this class and it queries the cursors. It builds the AsyncTaskLoader which performs cursor query on the background thread which in turn don’t block User Interface of application. This is the recommended way of retrieving data from content providers in asynchronous mode.
6.getLoaderManager().initLoader((ID, optional_arguments, LoaderManager.LoaderCallbacks_implementations): We initialize and retrieve a loader with this call.
initLoader() ensures the initialization of loader. It takes three arguments:
- ID is an identifier which is unique for each loader. It identifies a loader.
- Optional Arguments, if required, are supplied to loader while construction.
- LoaderManager calls the LoaderManager.LoaderCallbacks implementation to report the events of loader.
- initLoader() returns the loader and LoaderManager manages the life of loader automatically.
- initLoader() uses an existing loader which is identified by the unique ID. If no loader exists with that ID then it creates a new loader.
7.restartLoader(): This method discards the old data and saves new set of data in the loader.
8.onCreateLoader(): This is a method of LoaderManager.LoaderCallbacks interface. For an given ID, it instantiates a new loader and returns the brand new loader.
9.onLoadFinished(): This is a method of LoaderManager.LoaderCallbacks interface. When a previously called Loader has finished loading data, this method is called.
10.onLoaderReset(): This is also an constituent method of LoaderManager.LoaderCallbacks interface. If any previous loader is reset then this method is called.
3.11.3 Example of Android Loader
Let us create an Android loader App and check out what we have studied so far. For this, open eclipse and create a new project. Name it as you like. I shall name it as LoaderEx App. Before creating the project make sure that minimum SDK API value should be API 11 or more. It is so as Loaders are introduced in Android Honeycomb or Android 3.0. Although lower API level projects can support it but it cannot be guaranteed that they will run on real device or in the way you are expecting it to be. Open your main xml file and code it as shown below:
<RelativeLayout xmlns:android="http://schemas.android.com/apk/res/android"
      xmlns:tools="http://schemas.android.com/tools"
      android:layout_width="match_parent"
      android:layout_height="match_parent"
      android:paddingBottom="@dimen/activity_vertical_margin"
      android:paddingLeft="@dimen/activity_horizontal_margin"
      android:paddingRight="@dimen/activity_horizontal_margin"
      android:paddingTop="@dimen/activity_vertical_margin"
      tools:context=".MainActivity" >
      <TextView
        android:id="@+id/textView1"
        android:layout_width="wrap_content"
        android:layout_height="wrap_content"
        android:text="@string/hello_world" />
     <ListView
        android:id="@+id/listView1"
        android:layout_width="match_parent"
        android:layout_height="wrap_content"
        android:layout_alignParentLeft="true"
        android:layout_below="@+id/textView1" >
      </ListView>
main xml file of App
The graphical layout of file should be similar to the following snapshot as shown below:
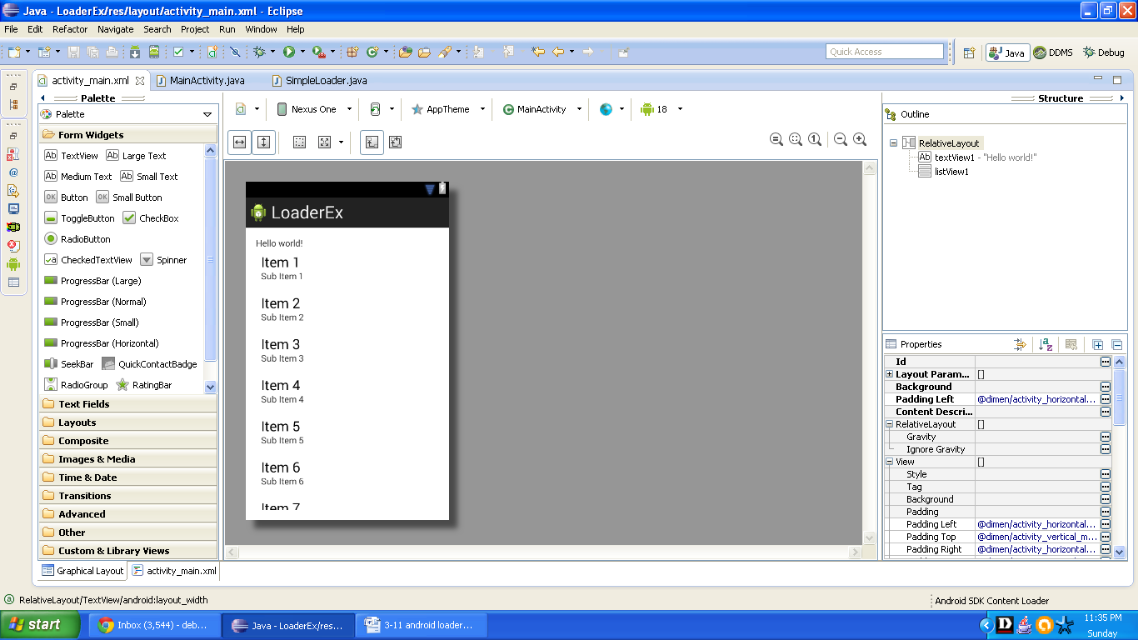
Figure - Graphical layout of our Android Loader app
Now open the MainActivity.java file of your application and code it as shown in the following listing:
package com.android.tution.Loader;

import java.util.List;

import android.annotation.TargetApi;
import android.app.Activity;
import android.app.LoaderManager.LoaderCallbacks;
import android.content.Loader;
import android.os.Build;
import android.os.Bundle;
import android.widget.ArrayAdapter;
import android.widget.ListView;

public class MainActivity extends Activity implements
       LoaderCallbacks<List<String>> {
       @Override
       protected void onCreate(Bundle savedInstanceState) {
              super.onCreate(savedInstanceState);
              setContentView(R.layout.activity_main);

              getLoaderManager().initLoader(OUR_LOADER, null, this).forceLoad();

        }
        @Override
        public Loader<List<String>> onCreateLoader(int id, Bundle arg1) {
              // TODO Auto-generated method stub
              SLoader loader = new SLoader(this);
              //Loader<List<String>> loader = new Loader<List<String>>(this);

             return loader;
        }
        @Override
        public void onLoadFinished(Loader<List<String>> loader, List<String> list) {
              // TODO Auto-generated method stub
              final ListView listView = (ListView) findViewById(R.id.listView1);
              final ArrayAdapter<String> adapter = new ArrayAdapter<String>(this,
              android.R.layout.simple_list_item_1, list);
              listView.setAdapter(adapter);
        }
        @Override
        public void onLoaderReset(Loader<List<String>> loader) {
              // TODO Auto-generated method stub
              final ListView listview = (ListView) findViewById(R.id.listView1);
              listview.setAdapter(null);
        }
}
Figure - MainActivity.java file of Android Loader app
Now create a inner java class which will be our simple loader. Right click on package name and create it as you were taught to do in previous tutorials. Open it and code it as shown in the following listing:
package com.android.tution.Loader;

import java.util.ArrayList;
import java.util.List;
import android.content.AsyncTaskLoader;
import android.content.Context;

public class SLoader extends AsyncTaskLoader<List<String>> {

       public SimpleLoader(Context context) {
           super(context);
           // TODO Auto-generated constructor stub
       }

       @Override
       public List<String> loadInBackground() {
            // TODO Auto-generated method stub
            final String[] fruits=new String[]{"Apple", "Orange", "Mango", "Pineapple", "Grapes", "Guava", "Peach", "Cherry", "Dates",
                   "Banana", "Jackfruit", "Pomegranate"};
            final ArrayList<String>list=new ArrayList<String>();
            for(int i=0;i<fruits.length;i++)
            {
                list.add(fruits[i]);

                try{
                    Thread.sleep(100);
                   }catch(InterruptedException e)
                   {
                     e.printStackTrace();
                   }
            }
        return list;
}
Figure - Loader class of app
Manifest of app should be as shown in the following listing:
<?xml version="1.0" encoding="utf-8"?>
<manifest xmlns:android="http://schemas.android.com/apk/res/android"
      package="com.android.tution.Loader"
      android:versionCode="1"
      android:versionName="1.0" >

      <uses-sdk
        android:minSdkVersion="11"
        android:targetSdkVersion="18" />
      <application
          android:allowBackup="true"
          android:icon="@drawable/ic_launcher"
          android:label="@string/app_name"
          android:theme="@style/AppTheme" >
          <activity
              android:name="com.android.tution.Loader.MainActivity"
              android:label="@string/app_name" >

              <intent-filter>
                 <action android:name="android.intent.action.MAIN" />

                  <category android:name="android.intent.category.LAUNCHER" />

              </intent-filter>
          </activity>
      </application>
</manifest>
Figure - Manifest of LoaderEx app
Now create an emulator with suitable API. Now run the application. Output of application should be similar to the following snapshot:
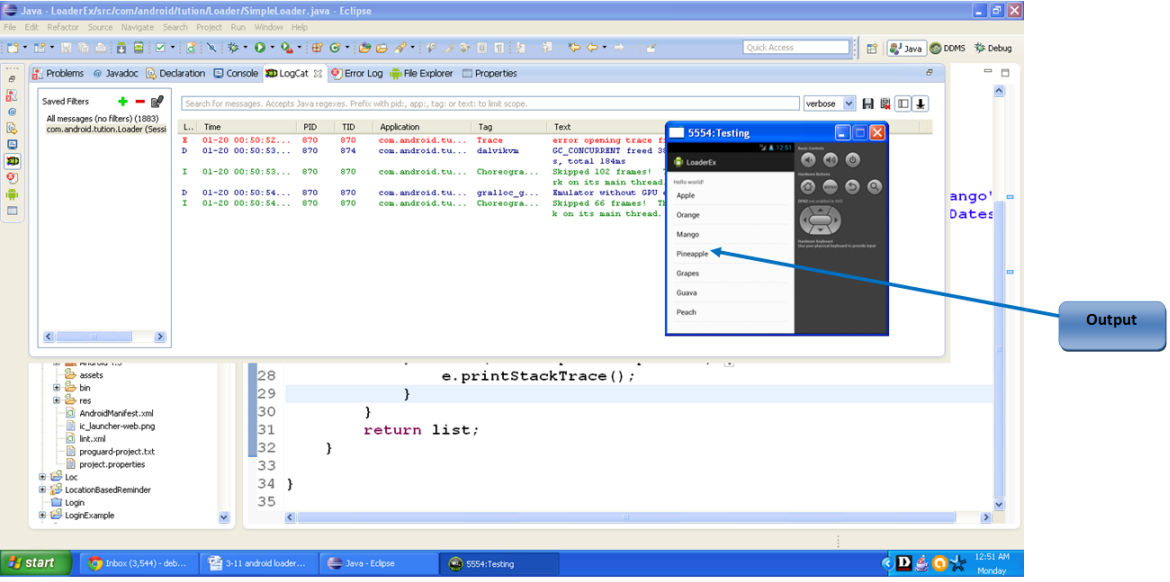
Figure - Output of Android LoaderEx App
Congratulations readers!! We have successfully completed our tutorial on loaders. See you in the next section. Till then keep practicing and Happy App Developing!!!