
Android Drawable Tutorial
In this chapter we will learn about Android drawables. We have already used drawables in our previous projects but since this is a part of our graphics system we have to learn this. Please don’t skip this topic as whatever technique we have used so far is not enough for a magnificent application. We have lot more to know about them.
7.2.1 Introduction to Android Drawable
There is a 2D graphics library offered by android framework which is used for drawing shapes and images. Android Drawable Class extends to define a variety of specific kinds of drawable graphics which includes BitmapDrawable, ShapeDrawable, PictureDrawable, etc. These classes can be extended to define customized drawables. Generally there are three ways of defining and specifying drawable objects which are as follows:
- Image is saved in resources
- An xml file which defines drawable properties
- Normal class constructors
Resource files technique is easiest and commonly used technique. It is best for icons or app images, etc. We refer to an image file from the project application. Generally we copy the image file in resource folder i.e., /res and refer it from the code. For example the grid view example app used so many cartoon images stored inside resource folder. Discussing redundant example is wastage of time. So I would suggest if there is anyone who has not checked our previous tutorials we suggest them to check out those tutorials so that they don’t get confused with the first technique. Supported files include PNG, JPG, and GIF. As we already know this technique and have used in previous applications so let us move on to next technique.
We can also create resource xml file. Any drawable subclass that inflate() method which can be defined in XML and instantiated by our application. This drawable supports XML inflation which utilizes specific XML attributes which helps in defining object properties. There is a class called ShapeDrawable which can be used to draw objects dynamically. We can draw shapes programmatically with this type of object. A ShapeDrawable extends the Drawable class. We can define backgrounds, borders, and gradient of views. Shape can be rectangle, oval, ring, etc. Gradient can be linear or radiant. You can set the color or you can also see the pre-defined colors in the framework.
NinePatchDrawable graphic is a stretchable bitmap image which is automatically resized to accumulate the contents of View. A NinePatchDrawable is a standard PNG image which contains additional 1-pixel wide border. Stretchable and static areas of image are defined by the border. This defines one stretchable area in top-left combination and other one in bottom-right combination respectively.
7.2.2 Android Drawable Example
Let us see some small examples and see the usage of these objects in our projects. We shall develop two small applications to demonstrate the usage of shape drawables for two different purposes. Create a project and name it as you like. I am naming it as DrawableEx application. Now create a class and name it CustomV. Code the class as shown in the following listing:
package com.android.tution.DrawableEx;
import android.content.Context;
import android.graphics.Canvas;
import android.graphics.Color;
import android.graphics.Rect;
import android.graphics.drawable.Drawable;
import android.graphics.drawable.ShapeDrawable;
import android.graphics.drawable.shapes.OvalShape;
import android.view.View;
public class CustomV extends View{
private ShapeDrawable mshape;
    public CustomV(Context context) {
        super(context);
        // TODO Auto-generated constructor stub
    int x=20;
    int y=20;
    int width=400;
    int height=100;
    mshape=new ShapeDrawable(new OvalShape());
    mshape.getPaint().setColor(Color.GREEN);
    mshape.setBounds(x, y, x+width, y+height);
    }
    @Override
    protected void onDraw(Canvas canvas) {
        // TODO Auto-generated method stub
        //super.onDraw(canvas);
    mshape.draw(canvas);
    }
}
Figure - class for defining our custom view
Now leave the activity_main.xml file as it is. For reference you can cross check with the following listing:
<RelativeLayout xmlns:android="http://schemas.android.com/apk/res/android"
    xmlns:tools="http://schemas.android.com/tools"
    android:layout_width="match_parent"
    android:layout_height="match_parent"
    android:paddingBottom="@dimen/activity_vertical_margin"
    android:paddingLeft="@dimen/activity_horizontal_margin"
    android:paddingRight="@dimen/activity_horizontal_margin"
    android:paddingTop="@dimen/activity_vertical_margin"
    tools:context=".MainActivity" >
    <TextView
        android:layout_width="wrap_content"
        android:layout_height="wrap_content"
        android:text="@string/hello_world" />
</RelativeLayout>
Figure - activity_main.xml file for Android Drawable example
The graphical layout would not be changed so it should look like the following snapshot:

Figure - Graphical layout of Android Drawable example
Open your main activity file. Code the main activity file as shown in the following listing:
package com.android.tution.DrawableEx;
import android.os.Bundle;
import android.app.Activity;
import android.view.Menu;
public class MainActivity extends Activity {
    CustomV customview;
    @Override
    protected void onCreate(Bundle savedInstanceState) {
        super.onCreate(savedInstanceState);
        // setContentView(R.layout.activity_main);
        customview = new CustomV(this);
        setContentView(customview);
    }
    @Override
    public boolean onCreateOptionsMenu(Menu menu) {
        // Inflate the menu; this adds items to the action bar if it is present.
        getMenuInflater().inflate(R.menu.main, menu);
        return true;
    }
}
Figure - Main activity file of Android Drawable example
<?xml version="1.0" encoding="utf-8"?>
<manifest xmlns:android="http://schemas.android.com/apk/res/android"
    package="com.android.tution.DrawableEx"
    android:versionCode="1"
    android:versionName="1.0" >
    <uses-sdk
        android:minSdkVersion="8"
        android:targetSdkVersion="18" />
    <application
        android:allowBackup="true"
        android:icon="@drawable/ic_launcher"
        android:label="@string/app_name"
        android:theme="@style/AppTheme" >
        <activity
            android:name="com.android.tution.DrawableEx.MainActivity"
            android:label="@string/app_name" >
            <intent-filter>
                <action android:name="android.intent.action.MAIN" />
                <category android:name="android.intent.category.LAUNCHER" />
            </intent-filter>
        </activity>
    </application>
Figure manifest file of Android Drawable example
We are done. Create a suitable emulator and run your application. Output should be similar to the following screenshot:
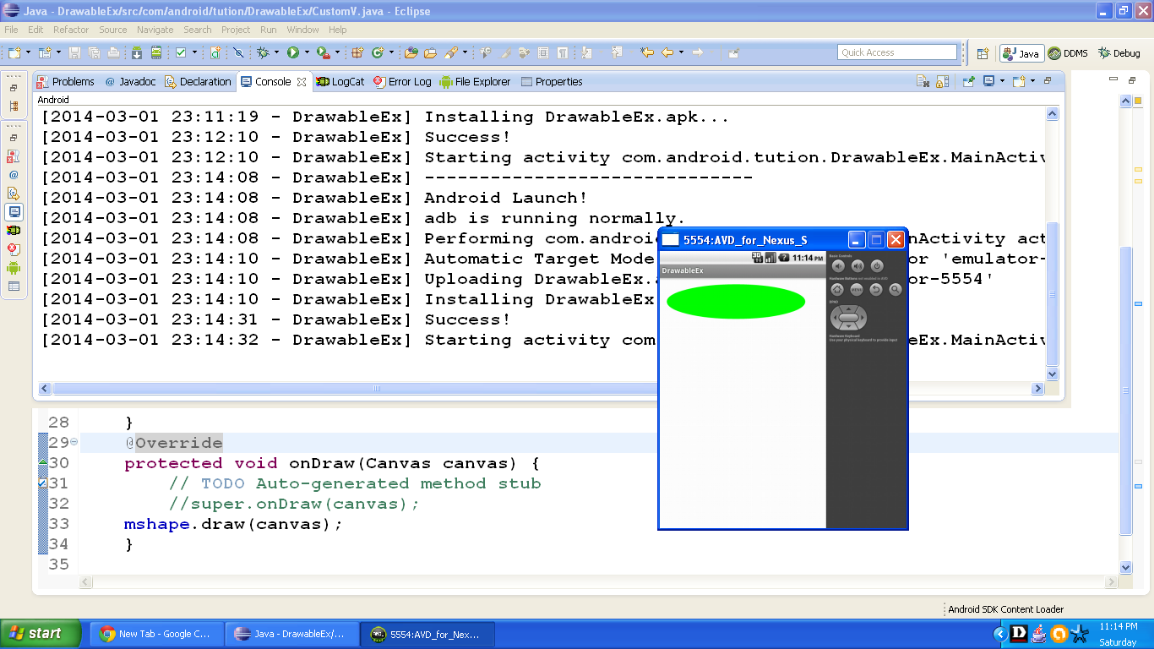
Figure - Output of DrawableEx application
Congratulations for the first success. We have programmatically drawn a green colored oval with Shape Drawables. Now we shall see the use of Shape Drawable in terms of customizing the background. So create a new project. Name it as you like. I am naming it DrawableSecondApp. Now create an xml file in the /res/drawable folder. Name it simple.xml. Code it as shown in the following listing:
<?xml version="1.0" encoding="utf-8"?>
<shape xmlns:android="http://schemas.android.com/apk/res/android"
    android:shape="rectangle" >
    <gradient
        android:centerColor="#55808D"
        android:endColor="#39629C"
        android:gradientRadius="200"
        android:startColor="#C8DAF2"
        android:type="radial" >
    </gradient>
Figure - simple.xml file of Android Drawable example
Now open your activity_main.xml file and code it as shown in the following listing:
<RelativeLayout xmlns:android="http://schemas.android.com/apk/res/android"
    xmlns:tools="http://schemas.android.com/tools"
    android:layout_width="match_parent"
    android:layout_height="match_parent"
    android:background="@drawable/simple"
    android:paddingBottom="@dimen/activity_vertical_margin"
    android:paddingLeft="@dimen/activity_horizontal_margin"
    android:paddingRight="@dimen/activity_horizontal_margin"
    android:paddingTop="@dimen/activity_vertical_margin"
    tools:context=".MainActivity" >
    <TextView
        android:layout_width="wrap_content"
        android:layout_height="wrap_content"
        android:text="HELLO READERS!!" />
</RelativeLayout>
Figure - activity_main.xml of Android Drawable example
The graphical layout should be similar to the following snapshot:
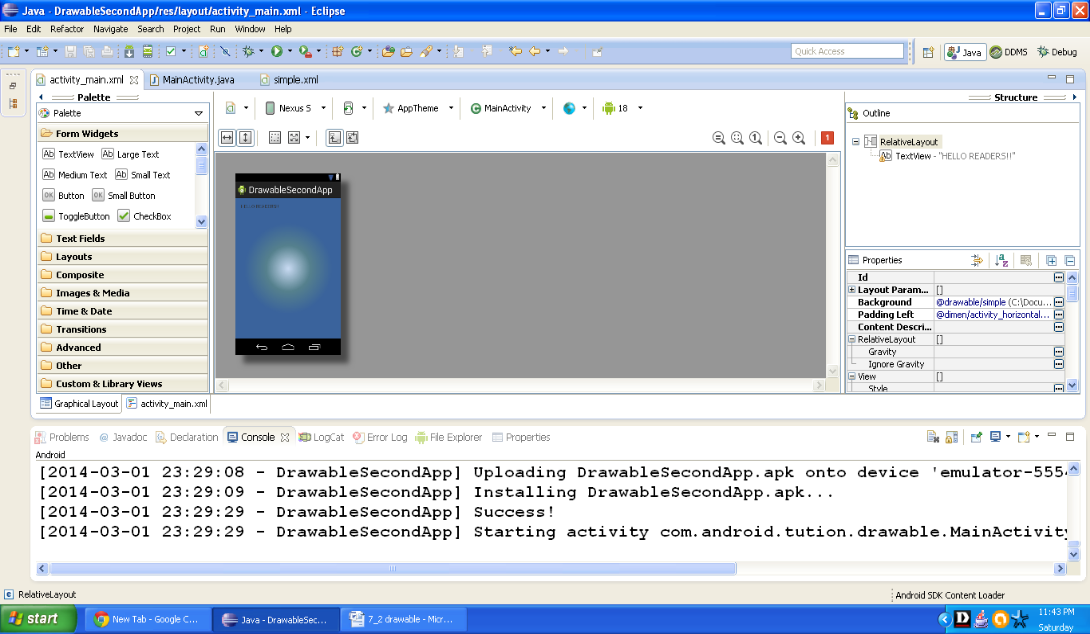
Figure - Graphical layout of Android Drawable example
Open you main activity file and code it as shown in the following listing:
package com.android.tution.drawable;
import android.os.Bundle;
import android.app.Activity;
import android.view.Menu;
public class MainActivity extends Activity {
    @Override
    protected void onCreate(Bundle savedInstanceState) {
        super.onCreate(savedInstanceState);
        setContentView(R.layout.activity_main);
    }
    @Override
    public boolean onCreateOptionsMenu(Menu menu) {
        // Inflate the menu; this adds items to the action bar if it is present.
        getMenuInflater().inflate(R.menu.main, menu);
        return true;
    }
}
Figure - Main activity file
Now cross check the manifest file of application with the following listing:
<?xml version="1.0" encoding="utf-8"?>
<manifest xmlns:android="http://schemas.android.com/apk/res/android"
    package="com.android.tution.drawable"
    android:versionCode="1"
    android:versionName="1.0" >
    <uses-sdk
        android:minSdkVersion="8"
        android:targetSdkVersion="18" />
    <application
        android:allowBackup="true"
        android:icon="@drawable/ic_launcher"
        android:label="@string/app_name"
        android:theme="@style/AppTheme" >
        <activity
            android:name="com.android.tution.drawable.MainActivity"
            android:label="@string/app_name" >
            <intent-filter>
                <action android:name="android.intent.action.MAIN" />
                <category android:name="android.intent.category.LAUNCHER" />
            </intent-filter>
        </activity>
    </application>
</manifest>
Figure - manifest file of application
So we are done. Create a suitable emulator and run your application. Output should be similar to the following screenshot:
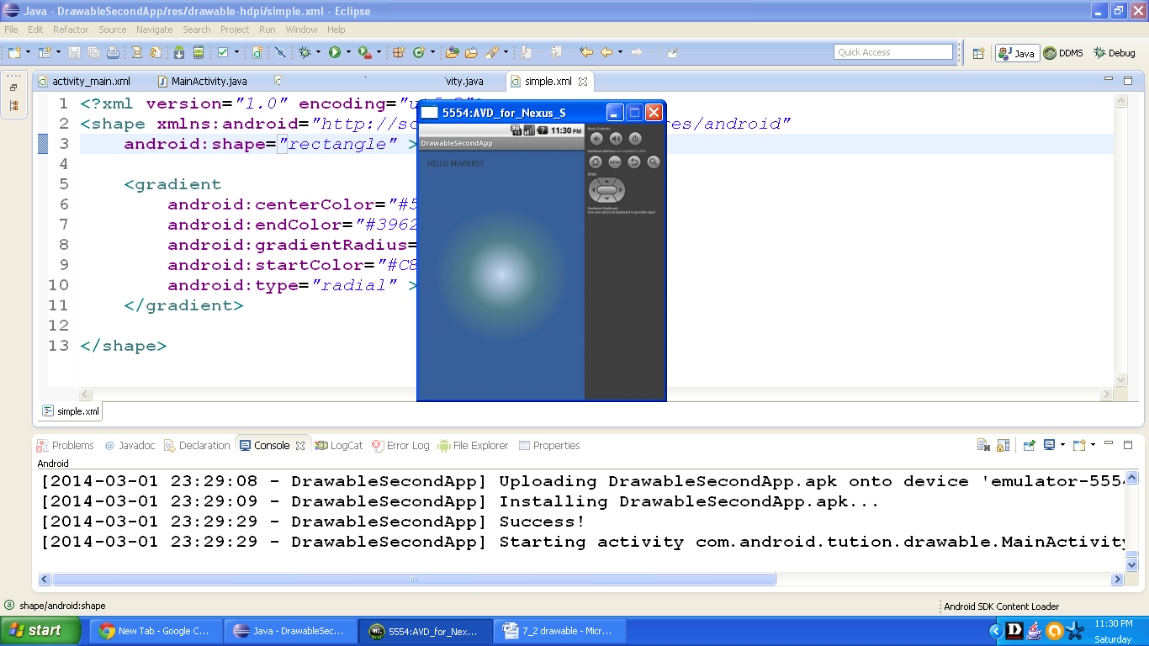
Figure - Output of DrawableSecondApp
CongratulationsJ buddies!!! We are done with drawables. Hope you enjoyed this tutorial. See you in the next section. Till then keep practicing. Happy App developing!!!