
22.1 Overview
REST stands for Representational State Transfer and is an architectural style. The intention is to use HTTP calls between machines instead of using complex mechanisms such as CORBA, RPC, SOAP. Traditional web service exposes methods, but REST web services exposes object representations.
Restful applications use HTTP methods (there are several HTTP methods like GET, POST, PUR, DELETE) for Create, Retrieve, Update and Delete the data operations and in general RESRful web services should handle POST, PUT, GET, HEAD, DELETE methods.
- GET: this method is used to retrieve the resource representation identified on the URI
- PUT: this method is used to update the resource representation identified on the URI
- POST- This method is used to create a new resource
- DELETE – This method is used to delete the resource identified on the URI
Now a day’s RESTful web services are very popular and almost all of the widely known social services like Facebook, Twitter, YouTube etc have exposed REST services to perform CRUD operations on data.
There are two scenarios where we can use REST API.
- Publishing application data as REST service
- Accessing data from REST service to use in an application.
To develop REST services with Spring , below two annotations are widely used.
a) @Request Mapping - This annotation is used to map the Request URLl to the handler methods and can be applied at a class level or at a method level.
Defining @RequestMapping at a class level will map the URL pattern to controller class and can be defined to map different URLs to handler methods.
@RequestMapping annotation allows to map the URL based on request method types as well. For example, below snippet will map the POST request coming for /index Url
@RequestMapping(value = "/index", method = RequestMethod.POST)
Default value of method attribute is GET.
b) @PathVariable –This annotation is used to accept the dynamic parameters in Request path and can utilize the dynamic path and can be of any simple type.
For example, below snippet will can map a dynamic url using @PathVariable annotation and /user/user1 and user/user2 both will be handled by below handler method.
@RequestMapping(value = "/user/{}", method = RequestMethod.POST)
public void getUser String userId)
{
}
c) @ResponseBody and @RequestBody– These are Spring mVC annotations and are used in a controller to perform serialization and deserialization of returning object or of the input object. These annotation, save us from writing conversion logic and support multiple formats for a single REST resource without duplication of code.
RESTful service can be designed to access and accept the data in several formats like JSON (Javascript Object Notation), XML.
In this chapter, we will discuss and implement both scenarios.
22.2 Create Restful web Service
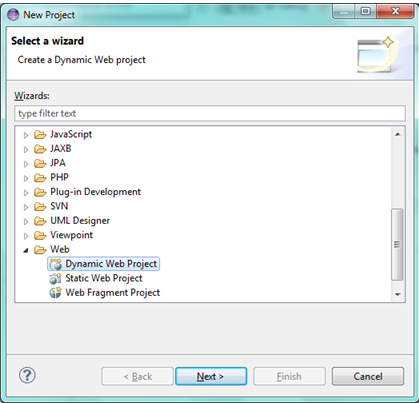
a) Create a dynamic web project and to do so go to
File ->New ->Project -> Web -> Dynamic Web -> Next (refer below)
b) Once you click Next, new window will open (refer below)
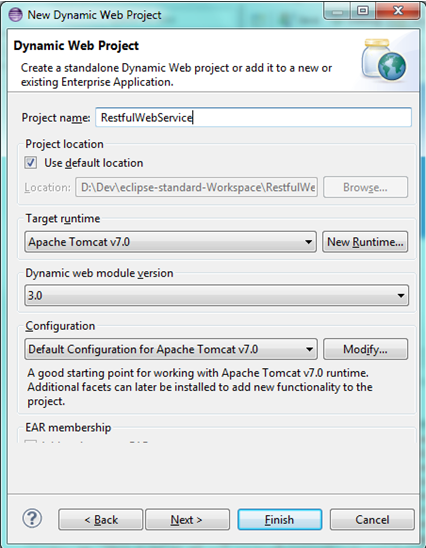
- Project Name –Give it a name. This will be the name of your web application. In the above figure, a web application with name “RestfulWebService” will be created
- "Target Runtime", choose "Apache Tomcat v7.0"
- Leave rest all as default values .Click Finish
Once done , a new project with name “RestfulWebService” will be created (refer below figure)
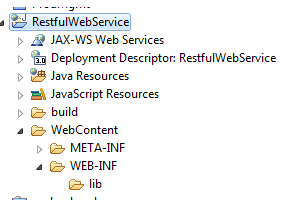
Details-
- All java code including controllers will be created under src folder
- All static contents and jsp will be created under WebContent
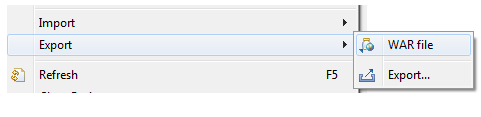
Clicking on War file, a new window will be opened Choose a Destination as the webapps folder of your tomcat installation directory.
Note- You can select any destination folder and eclipse will create a RestfulWebService.war file at the selected location. However, each server has its own directory from where it deploys the war file.
In case of tomcat “webapps” directory is the deployment directory and for any web application to be deployed on tomcat, it has to be placed in webapps.
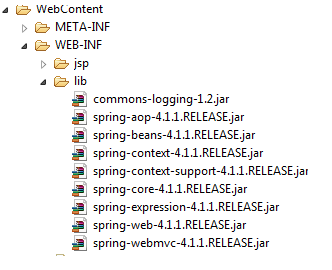
c) Add Spring Jar files in the build path
Now is the time to add the jar files of Spring and commons-logging we downloaded in Chapter 3 (section 3.6) in the java project.
Copy the below jar files and paste in WebContent\WEB-INF\lib folder
- commons-logging-1.2.jar
- spring-beans-4.1.1.RELEASE.jar
- spring-context-4.1.1.RELEASE.jar
- spring-context-support-4.1.1.RELEASE.jar
- spring-core-4.1.1.RELEASE.jar
- spring-expression-4.1.1.RELEASE.jar
- spring-web-4.1.1.RELEASE.jar
- spring-webmvc-4.1.1.RELEASE.jar
- spring-aop-4.1.1.RELEASE.jar
- jackson-core-2.4.3.jar
- jackson-databind-2.4.3.jar
- jackson-annotations-2.4.3.jar
d) Create a web.xml with below content in WEB-INF directory
<?xml version="1.0" encoding="UTF-8"?>
 <web-app xmlns:xsi="http://www.w3.org/2001/XMLSchema-instance" xmlns="http://java.sun.com/xml/ns/javaee" xsi:schemaLocation="http://java.sun.com/xml/ns/javaee http://java.sun.com/xml/ns/javaee/web-      app_3_0.xsd" version="3.0">
  <display-name>Spring REST API Tutorial</display-name>
  <servlet>
       <servlet-name>RestfulWebService</servlet-name>
       <servlet-class>
          org.springframework.web.servlet.DispatcherServlet
       </servlet-class>
       <load-on-startup>1</load-on-startup>
   </servlet>

   <servlet-mapping>
      <servlet-name>RestfulWebService</servlet-name>
      <url-pattern>/</url-pattern>
   </servlet-mapping>
</web-app>
22.3 Publish a Student REST service Example
In this example we will create and publish a Student rest service .
package com.spring.rest.tutorial;
public class Student {
          private String name;
          private String studentID;
          private String contactNumber;
          private String  course;
          public String getName() {
             return name;
          }
          public void setName(String name) {
            this.name = name;
          }
           public String getStudentID() {
             return studentID;
          }
          public void setStudentID(String studentID) {
             this.studentID = studentID;
          }
          public String getContactNumber() {
           return contactNumber;
          }
          public void setContactNumber(String contactNumber) {
          this.contactNumber = contactNumber;
          }
           public String getCourse() {
             return course;
          }
           public void setCourse(String course) {
             this.course = course;
         }
}
b. Create RestfulWebService-servlet.xml
<beans xmlns="http://www.springframework.org/schema/beans"
    xmlns:xsi="http://www.w3.org/2001/XMLSchema-instance" xmlns:context="http://www.springframework.org/schema/context"
    xmlns:mvc="http://www.springframework.org/schema/mvc"
    xsi:schemaLocation="http://www.springframework.org/schema/beans
    http://www.springframework.org/schema/beans/spring-beans-3.0.xsd
    http://www.springframework.org/schema/context
    http://www.springframework.org/schema/context/spring-context-3.0.xsd
    http://www.springframework.org/schema/mvc
    http://www.springframework.org/schema/mvc/spring-mvc-3.0.xsd">

   <context:component-scan base-package="com.spring.rest.tutorial" />
   <mvc:annotation-driven />
</beans>
c. Create StudentRestServiceController.java
package com.spring.rest.tutorial;

import java.util.ArrayList;
import java.util.HashMap;
import java.util.Iterator;
import java.util.List;
import java.util.Map;
import java.util.Set;

import org.springframework.stereotype.Controller;
import org.springframework.web.bind.annotation.PathVariable;
import org.springframework.web.bind.annotation.RequestBody;
import org.springframework.web.bind.annotation.RequestMapping;
import org.springframework.web.bind.annotation.RequestMethod;
import org.springframework.web.bind.annotation.ResponseBody;

@Controller
public class StudentRestServiceController {

      private static Map<String,Student> studentsData = new HashMap<String,Student>();

      @RequestMapping("/students")
      public @ResponseBody List<Student> getAllStudents()
      {

        Set<String> set = studentsData.keySet();
        Iterator<String> it = set.iterator();
        List<Student> students = new ArrayList<Student>();
        while(it.hasNext())
          {
           String id = it.next();
           students.add(studentsData.get(id));
          }
        return students;
      }
       @RequestMapping("/student/{studentId}")
       public @ResponseBody Student getStudent(@PathVariable("studentId") String id)
       {
         return studentsData.get(id);
       }
      @RequestMapping(value ="/student/delete/{studentId}" ,method=RequestMethod.DELETE)
      public @ResponseBody Student deleteStudent(@PathVariable("studentId") String id)
      {
        return studentsData.remove(id);
      }

      @RequestMapping(value ="/student/add" ,method=RequestMethod.POST)
      public @ResponseBody Student  addStudent(@RequestBody Student studnet)
      {
         studentsData.put(studnet.getStudentID(), studnet);
         return studnet;
      }
}
d. Testing-
We can invoke the REST service programmatically or using the browser. With browser we will be able to test only the GET operations directly.
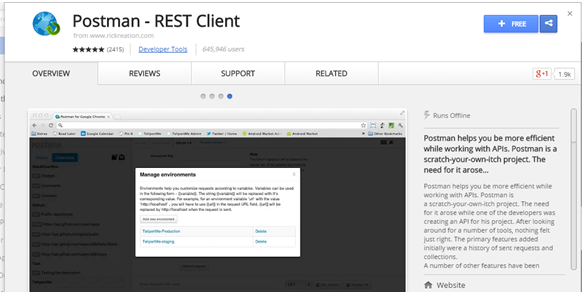
There are several REST test client available. We will use POSTMAN REST client available as a Google Chrome extension
You can download the POSTMAN REST client from
https://chrome.google.com/webstore/detail/postman-rest-client/fdmmgilgnpjigdojojpjoooidkmcomcm?hl=en
f. Then Click on Free button
Once Installed , you can test our REST service using it.
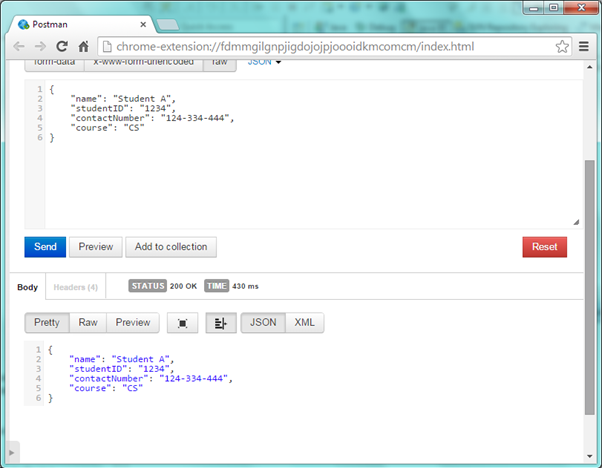
a)Add student
Open the REST client and enter the URL as http://localhost:8080/RestfulwebService/student/add , select the method as POST , set the content type header as application/json because we will send the data in JSON format and then add student representation as JSON
{
"name": "Student A",
"studentID": "1234",
"contactNumber": "124-334-444",
"course": "CS"
}
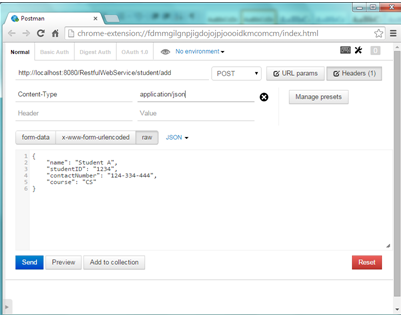
Once done , click Send button . Web service will return the created object representation.
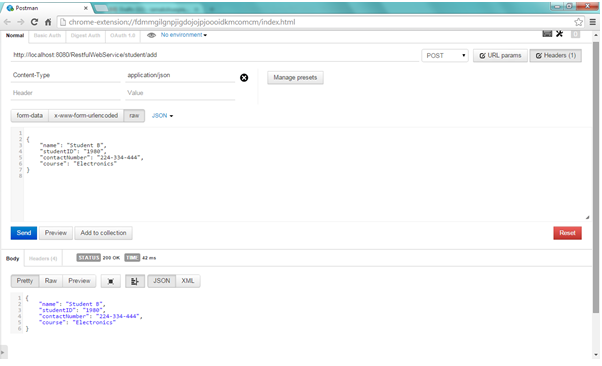
b. Add another student
Open the REST client and enter the URL as http://localhost:8080/RestfulwebService/student/add , select the method as POST , set the content type header as application/json because we will send the data in JSON format and then add student representation as JSON
{
"name": "Student B",
"studentID": "1980",
"contactNumber": "224-334-444",
"course": "Electronics"
}
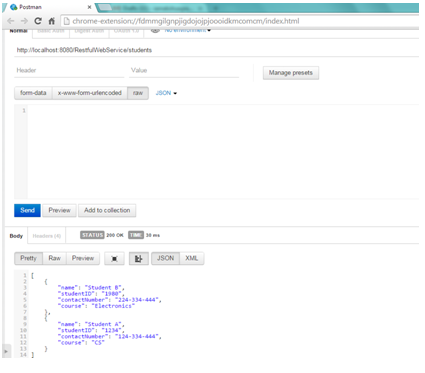
c) Get list of all students
Open the REST client and enter the URL as http://localhost:8080/RestfulwebService/students , select the method as GET . We can see that web service has returned two Students.
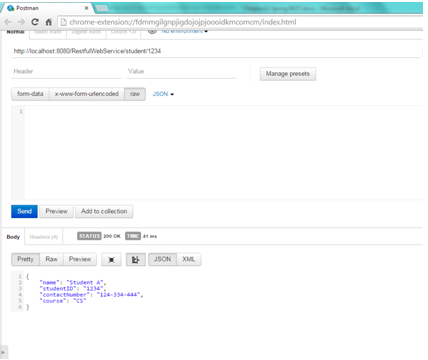
d) Get detail of a specific student
Open the REST client and enter the URL as http://localhost:8080/RestfulwebService/student/1234
, select the method as GET . We can see that web service has returned student representation whose Id is 1234.
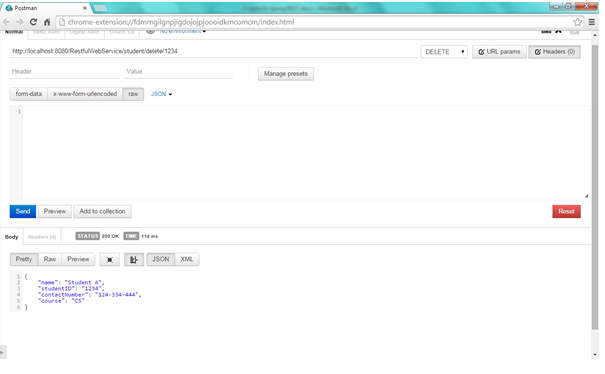
e. Delete student with student id 1234
Open the REST client and enter the URL as http://localhost:8080/RestfulwebService/student/delete/1234
, select the method as DELETE . We can see that web service has returned student representation whose Id is 1234.
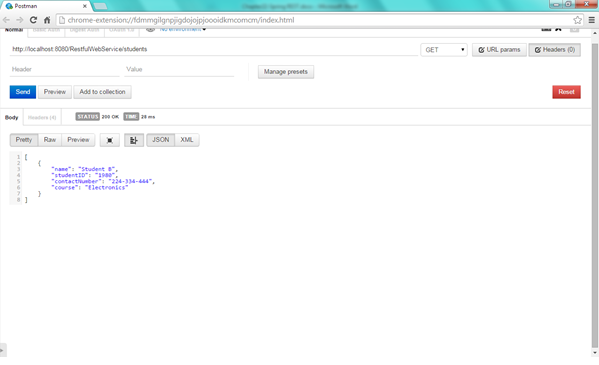
f. Get list of all students
Open the REST client and enter the URL as http://localhost:8080/RestfulwebService/students , select the method as GET . We can see that web service has returned one Student because we have deleted student with ID 1234
22.4 . Access REST web service using Spring
Spring provides a template class “RestTemplate” under org.springframework.web.client.RestTemplate package and is similar to the Jdbc Template. Similar to Jdbc Template , Rest Template aims to access the Rest services and developer need not to write unnecessary code. Now a day’s several social sites like Facebook, Twitter, Flickr, Google plus, yahoo, YouTube, sales force, instagram etc have exposed the REST web service to access the data using oAuth. There are several other options available which can be used to access the Rest web services. The most popular is Jersey Client. This is also a powerful Rest client API and is widely used.
In this section we will discuss RestTemplate with the example
RestTemplate class provides below methods
- headForHeaders(String, Object) - This method performs an HTTP HEAD operation
- getForObject(String, Class, Object)- This method performs an HTTP GET operation
- postForLocation(String, Object, Object) – This method performs an HTTP POST operation using an object
- postForObject(String, Object, Class, Object)- This method performs an HTTP POST operation using a class.
- put(String, Object, Object)- This method performs an HTTP PUT operation
- delete(String, Object) - This method performs an HTTP DELETE operation
Lets create AccessingRestWebService which will access the Student rest web service created in section 22.3 using Rest Template class.
a. RestfulWebservice-servlet.xml
<beans xmlns="http://www.springframework.org/schema/beans"
     xmlns:xsi="http://www.w3.org/2001/XMLSchema-instance" xmlns:context="http://www.springframework.org/schema/context"
     xmlns:mvc="http://www.springframework.org/schema/mvc"
     xsi:schemaLocation="http://www.springframework.org/schema/beans
     http://www.springframework.org/schema/beans/spring-beans-3.0.xsd
     http://www.springframework.org/schema/context
     http://www.springframework.org/schema/context/spring-context-3.0.xsd
     http://www.springframework.org/schema/mvc
     http://www.springframework.org/schema/mvc/spring-mvc-3.0.xsd">

     <context:component-scan base-package="com.spring.rest.tutorial" />
     <mvc:annotation-driven />
</beans>
b. Create AccessingRestWebService.java and use Rest Template
package com.spring.rest.tutorial;

import java.util.List;

import org.springframework.beans.factory.annotation.Autowired;
import org.springframework.stereotype.Controller;
import org.springframework.web.bind.annotation.PathVariable;
import org.springframework.web.bind.annotation.RequestBody;
import org.springframework.web.bind.annotation.RequestMapping;
import org.springframework.web.bind.annotation.ResponseBody;
import org.springframework.web.client.RestTemplate;

@Controller
public class AccessRestWebService {
     @RequestMapping("/getStudent/{studentId}")
      public @ResponseBody Student getStudent(@PathVariable("studentId") String studentId) {

           RestTemplate restTemplate = new RestTemplate() ;
           Student result = restTemplate.getForObject("http://localhost:8080/RestfulWebService/student/{id}",Student.class,studentId);
           return result;
      }

      @RequestMapping("/getStudents")
      public @ResponseBody List<Student> getStudents() {
             RestTemplate restTemplate = new RestTemplate() ;
             List<Student> result = restTemplate.getForObject("http://localhost:8080/RestfulWebService/students",List.class);
             return result;
      }

      @RequestMapping("/createStudent")
      public @ResponseBody Student createStudent ()
      {

         Student student = new Student();
         student.setContactNumber("1230-9990-333");
         student.setCourse("electronics");
         student.setName("Student XY");
         student.setStudentID("ABCD");

         RestTemplate restTemplate = new RestTemplate() ;
         Student result = restTemplate.postForObject("http://localhost:8080/RestfulWebService/student/add",student,Student.class);
        return result;
    }
}
c. Testing
Open browser and hit “http://localhost:8080/RestfulWebService/createStudent “ . New student object will be created

Open browser and hit “http://localhost:8080/RestfulWebService/getStudents “ . Students list will be returned

Open browser and hit “ http://localhost:8080/RestfulWebService/getStudent/ABCD “ Student with student Id “ABCD will be returned
