5.1 Overview of Spring loC Container
As we discussed in earlier chapters, Ioc (Inversion of Control) is the heart of the spring framework. Container manages the java objects of the spring application from instantiation to destruction.
IoC adds the flexibility and control of application, and provides a central place of configuration management for Plain Old Java Objects of our application.
Within Spring IoC we can configure if the object is a singleton or not , at what point the object will created and destroyed.
Spring container uses dependency injection (DI) to manage the objects.
Below figure illustrates the container where objects are created and wired together
Spring comes with several container implementations and these implementations are grouped in to two types
- Bean Factory
- Application Context
5.2 BeanFactory
Bean Factory provides the basic support for DI and defined in org.springframework.beans.factory.BeanFactory interface. BeanFactory is based on factory design pattern which creates the beans with the only difference that it creates the bean of any type (as compared to traditional factory pattern which creates a beans of similar types).
5.2.1 BeanFactory Implementations
There are several implementations of BeanFactory is available but out of all the most popular is XmlBeanFactory which loads the beans from a XML file.
Several Resource implementations can be provided to XmlBeanFactory so XMLBeanFactory can load the XML file from various sources. Most commonly used Resource implementations are -
- ByteArrayResource
- ClassPathResource
- FileSystemResource
- InputStreamResource
- UrlResource
5.2.2 Lazy Loading
With BeanFactory the beans are lazily loaded which means beans are loaded as soon as bean factory instance is created but the beans are created only when getBean() method is called.
5.2.3 BeanFactory Example
Create a java project and add the spring libraries as described in chapter 4.
5.2.3.1
Let's create a program to demonstrate that bean factory loads the bean lazily.
Solution –
a) Create a Calculation Class which returns the sum of salary and bonus. Add the default constructor in the class with some message.
      public class Calculation {

          private int salary;
          private int bonus;

          public Calculation()
         {
             System.out.println("Calculation Bean Created");
         }
          public int getSalary() {
             return salary;
         }
         public void setSalary(int salary) {
            this.salary = salary;
         }
         public int getBonus() {
            return bonus;
         }
         public void setBonus(int bonus) {
            this.bonus = bonus;
         }
         public int getTotal()
         {
            return salary+bonus;
         }

    }
b) Create a beans.xml file in src directory to define the CalculationBean
<?xml version="1.0" encoding="UTF-8"?>

<beans xmlns="http://www.springframework.org/schema/beans"
    xmlns:xsi="http://www.w3.org/2001/XMLSchema-instance"
    xsi:schemaLocation="http://www.springframework.org/schema/beans


    <bean id="calculationBean" class="Calculation">
       <property name="salary" value="1000"/>
        <property name="bonus" value="100"/>
    </bean>

</beans>
- id- is unique id
- class- is the fully qualified class name of bean
- property- is the property of class and has name and value attribute to define the name and value of the property. We can have multiple property tags one for each property of bean
- Bean must follow the POJO guidelines
Note: You must be wondering that salary and bonus fields are defined as int where as in beans.xml , values are passed as String. Answer is- Spring Container manages the type casting.
c) Create TestCalculation class which will just loads the beans.xml using ClassPathResource
import org.springframework.beans.factory.BeanFactory;
import org.springframework.beans.factory.xml.XmlBeanFactory;
import org.springframework.core.io.ClassPathResource;

public class TestCalculation {
    public static void main(String[] args) {

     BeanFactory beanFactory =  new XmlBeanFactory
                                    (new ClassPathResource("beans.xml"));

    }
}
As the beans.xml (beans configuration ) is available in classpath , we have used ClassPathResource implementation of Bean Factory..
d) Run the Program
You will see below output and message we added in constructor of Calculation class is not printed which shows that bean is not created.

5.2.3.2
Update the above Calculation program to calculate the total.
Solution-
a) Update the TestCalculation Class to create instance of calculation bean and invoke total method
import org.springframework.beans.factory.BeanFactory;
import org.springframework.beans.factory.xml.XmlBeanFactory;
import org.springframework.core.io.ClassPathResource;

public class TestCalculation {
    public static void main(String[] args) {

    BeanFactory beanFactory =
    new XmlBeanFactory( new ClassPathResource("beans.xml"));

       Calculation calulation = (Calculation)beanFactory.getBean("calculationBean");
        System.out.println(calulation.getTotal());

    }
}
b) Run the Program
You can see the result as well as the message of constructor which means calling getBean() instantiated the object.

5.2.3.3
Change the Resource Implementation from Class Path resource to FileSystem resource
Solution-
FileSystemResource loads the file from file system
- Copy the beans.xml from src directory and paste it in C drive
- Update the TestCalculation
import java.io.File;
import org.springframework.beans.factory.BeanFactory;
import org.springframework.beans.factory.xml.XmlBeanFactory;
import org.springframework.core.io.FileSystemResource;

public class TestCalculation {
    public static void main(String[] args) {

       File file = new File("C:\\beans.xml");

       BeanFactory beanFactory =
       new XmlBeanFactory( new FileSystemResource(file));
       Calculation calulation = (Calculation)beanFactory.getBean("calculationBean");
       System.out.println(calulation.getTotal());
    }
}
- Run the Program
You can see the result as below figure and also the path from where the beans configurations are loaded.

5.3 Spring Application Context
ApplicationContext is the advanced Spring container and defined by org.springframework.context.ApplicationContext interface. Application supports the features supported by Bean Factory but also provides additional features like –
- Convenient MessageSource access (for i18n)
- ApplicationEvent publicationEvent handling
- Generic way to load resources
- Automatic BeanPostProcessor registration
- Automatic BeanFactoryPostProcessor registration
5.3.1 Spring ApplicationContext Implementations
There are several implementations of ApplicationContext is available but out of all the most commonly used are –
- ClassPathXmlApplicationContext- Loads the file beans configuration from XML file available in class path.
- FileSystemXmlApplicationContext- Loads the file beans configuration from XML file available in file system.
- XmlWebApplicationContext- Applicable for web applications only and loads the beans configurations available in web application.
As we discussed and verified that BeanFactory lazily loads the beans but this not the case with Application Context. Instance of beans are created as soon as we create the instance of Application context.
5.3.2 Spring Application Context Examples
Create a java project and add the spring libraries as described in chapter 4.
5.3.2.1
Let's create a program to demonstrate that Application Context does not load the beans lazily instead instantiates as soon as context is created
Solution –
- Create a DisplayMessage Class which displays the message. Add the default constructor in the class with some message.
public class DisplayMessage {
   private String message;

   public DisplayMessage()
   {
       System.out.println("Display Message Bean Crated !!!");
   }
   public void setMessage(String message){
      this.message  = message;
   }
   public String  getMessage(){
      return this.message;
   }
}
- Create a beans.xml file in src directory to define the DisplayMessage
<?xml version="1.0" encoding="UTF-8"?>

<beans xmlns="http://www.springframework.org/schema/beans"
    xmlns:xsi="http://www.w3.org/2001/XMLSchema-instance"
    xsi:schemaLocation="http://www.springframework.org/schema/beans
    http://www.springframework.org/schema/beans/spring-beans-3.0.xsd">

    <bean id="displayMessageBean" class="DisplayMessage">
       <property name="message" value="Application Context Example"/>

   </bean>
</beans>
- id- is unique id
- class- is the fully qualified class name of bean
- property- is the property of class and has name and value attribute to define the name and value of the property. We can have multiple property tags one for each property of bean
- Bean must follow the POJO guidelines
- Create TestDisplayMessage class which will create the Application Context using ClassPathXmlApplicationContext
import org.springframework.context.ApplicationContext;
import org.springframework.context.support.ClassPathXmlApplicationContext;

public class TestDisplayMessage {
    public static void main(String[] args) {

    ApplicationContext context =
      new ClassPathXmlApplicationContext("beans.xml");

    }
}
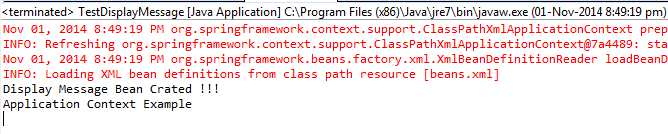
- Run the Program
You will see message we added in constructor of DisplayMessage even if we did not call getBean() API

5.3.2.2
Update the above program to display the message configured in beans.xml
Solution-
- Update the TestDisplayMessage Class to create instance of DisplayMessage class and invoke getMessage method
import org.springframework.context.ApplicationContext;
import org.springframework.context.support.ClassPathXmlApplicationContext;

public class TestDisplayMessage {
    public static void main(String[] args) {

       ApplicationContext context =
       new ClassPathXmlApplicationContext("beans.xml");

       DisplayMessage message = (DisplayMessage)context.getBean("displayMessageBean");

       System.out.println(message.getMessage());

    }
}
- Run the Program
You can see the below results.
5.3.2.3
Change the ApplicationContext Implementation from ClassPathXmlApplicationContext to FileSystemXmlApplicationContext
Solution-
FileSystemXmlApplicationContext loads the file from file system
- Copy the beans.xml from src directory and paste it in C drive
- Update the TestDisplayMessage
import org.springframework.context.ApplicationContext;
import org.springframework.context.support.FileSystemXmlApplicationContext;

   public class TestDisplayMessage {
      public static void main(String[] args) {

         ApplicationContext context =
         new FileSystemXmlApplicationContext("C:\\beans.xml");

         DisplayMessage message = (DisplayMessage)context.getBean("displayMessageBean");
         System.out.println(message.getMessage());
     }
  }
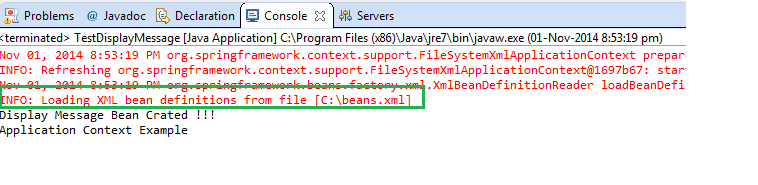
- Run the Program
You can see the result as below figure and also the path from where the beans configurations are loaded.