
4.2.1 Understanding Attributes
Attributes play an important role in giving your web page a newer look. They help us in improving the appearance of a web page. While the tags of HTML tell the browser what to present, its attributes tells how to present that.
Browser looks for the information from attributes while processing the tags to give the web page a customized look, if you do not use these attributes then the browser will apply the default settings.
- We can control the presentation of a web page using attributes.
- HTML attributes increase the capability of a HTML element.
- We use HTML attributes in pairs, name of the attribute & the value we want to assign to that particular attribute.
- We can assign a value to an attribute name using “=” (equals to) symbol.
- For an element, we can assign any number of attributes (if ever they are applicable to that element), by separating each attribute with a space.
- The names & values of the attributes in HTML are case insensitive.
- Even though we are free to use any case, we suggest you to use lower case attributes & values to improve readability.
- Before CSS (Cascading Style Sheet, applies styling to a web page) was introduced, all the formatting was done using the attributes.
The General syntax for assigning attributes to HTML element is,
<Tag attribute_Name =”attribute_value” >Content </Tag>
To get desired results, attribute values should always be enclosed in either single quotes or double quotes.
However, the attribute value can remain unquoted (but not in XHTML) if it does not contain spaces or any other delimiter like ' ` = < > or "
Example for Attributes:
Remember, we have used this line in our previous program,
<meta name=”Keywords” content=”HTML, Basics, style, CSS, head,” />
Tag Attribute Attribute
Name Name Value
Note that the above example uses more than one attribute–value pairs.
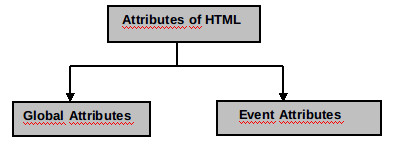
Classification of Attributes:
Based upon their functionality, the attributes of HTML are broadly classified as:
1. Global attributes
2. Event Attributes
Global Attributes:
These attributes can be applied on almost all HTML Elements. So, the name Global attributes. These are also called Core attributes.
We mostly use the following global attributes:
- class
- id
- style
- title
The Class Attribute:
- This attribute is used for creating different classes for an element.
- A class has its own set of properties which can be applied on the element.
- Classes are used in CSS for applying styles to a web page.
- The class attribute is used to point to a class in the style sheet.
In HTML5 the class attribute can be used on any HTML element whereas in HTML4 it cannot be used on the following
Base Head Html Meta Param script style and title.
Syntax for Class attribute:
Naming Conventions for Class Names:
- Class name must begin with A-Z or a-z
- It can include alphabets (both case),digits(0-9),hyphen(-) and Underscore(_)
- HTML is case insensitive, so are the class names.
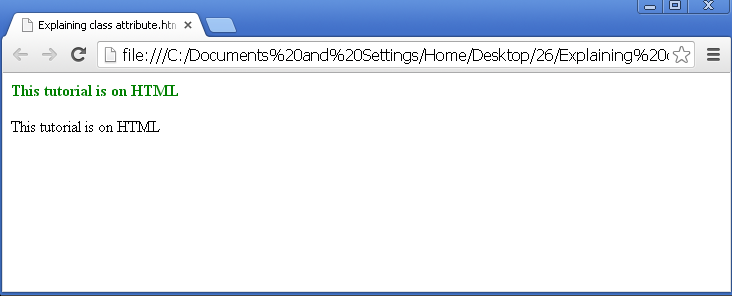
Example for Class attribute
<html>
   <head>
      <style type="text/css">
         p.techpoint {font-weight: bold; color: green ;}
      </style>
   </head>
   <body>
      <p class=" techpoint ">This tutorial is on HTML</p>
      <p>This tutorial is on HTML</p>
   </body>
</html>
In the above example, we used some new elements, you will learn about them as we go further.
For now, observe the code within the style element.
- Info is the name of the class we are applying to a paragraph tag, so it became p.info (since tag for paragraph is<p>).
- This class contains two instructions, to make the font bold & change the font color to green.
- You can see in the body tag, we called the class info, so the text within that paragraph will be formatted as per the instructions enclosed in the class.
- Whereas, the text within another <p> would be simply printed.
The id attribute:
- The id attribute of html assigns a name to a HTML element.
- This id (or name) is used for uniquely identifying an element of a document.
- This attribute is mainly useful while applying styles to a web page.
- Because they are unique, we can be sure that we are applying styling to that particular element only.
- In HTML5 you can apply this attribute on any element, but in HTML 4.01 you cannot apply this attribute on,
Ø Base
Ø Head
Ø Html
Ø Meta
Ø Script
Ø Style
Ø title
- We can go to a particular location in a web page, by adding the id at the end of page URL preceding it by # symbol.
For example,
http://www.javabeginner.com#sbb
Syntax for id attribute:
<Element_name id=”value of the id”> </Element_name>
Important Points to be noted:
- The value of id must begin with A-Z or a-z
- It can include alphabets (both case), digits(0-9),hyphen(-) , Underscore(_),Colon(;) and periods(.)
- It should not contain spaces.
- No two elements in a document should have the same id means if the id name is once used, it cannot be assigned to any other element.
- An element in a document can have two different ids i.e.,
<p id=”tech”> This page explains about id attribute</p>
<p id=”point”>You are learning HTML</p>
In the above example, we have assigned two different ids to a paragraph element. So, the text will be displayed according to the rules specified in the respective ids.
- In HTML5 you can apply this attribute on any element, but in HTML 4.01 you cannot apply this attribute on,
Ø Base
Ø Head
Ø Html
Ø Meta
Ø Script
Ø Style
Ø title
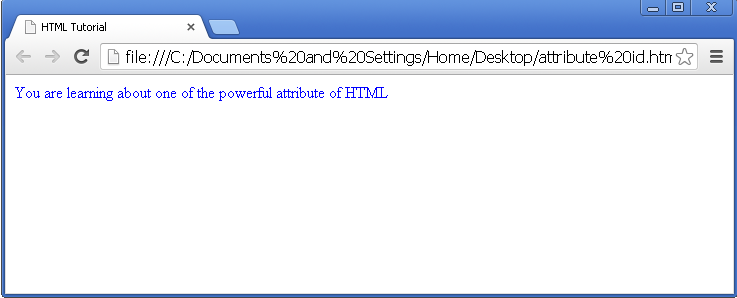
Example for id attribute :
<html>
   <head>
      <title>HTML Tutorial</title>
      <style type="text/css">
         #HELLO {
         color: blue;
         }
      </style>
   </head>
   <body>
      <p id="HELLO" >You are learning about one of the powerful attribute of HTML</p>
   </body>
</html>
The output of this program would be:
Difference between id and class attribute:
If you notice, our example for both class and id attributes look similar, but they function differently.
- Id is unique whereas classes are not unique.
- Each page can have only one element with that id.
- These two attributes are generally referred as document-wide identifiers, because they are used to identify an element in a document.
- The attribute id is more powerful than the class attribute.
The Style attribute:
The Style attribute is used for specifying style rules for a web document. We will discuss about this attribute in further chapters.
The syntax for style attribute is
<Element_name style=” style rules”>Content</Element_name>
In HTML5 you can apply this attribute on any element, but in HTML 4.01 you cannot apply this attribute on,
Ø Base
Ø Head
Ø Html
Ø Meta
Ø Script
Ø Style
Ø title
Ø Param
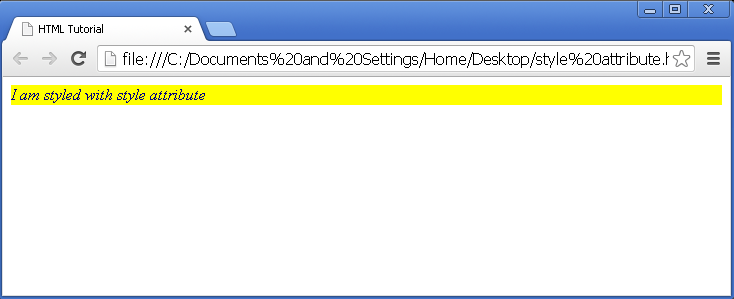
Example for Style attribute:
<html>
   <head>
      <title>HTML Tutorial</title>
   <body>
      <p style="color: navy; font-style: italic; background-color: yellow; ">I am styled with style attribute</p>
   </body>
</html>
The output of this program would be:
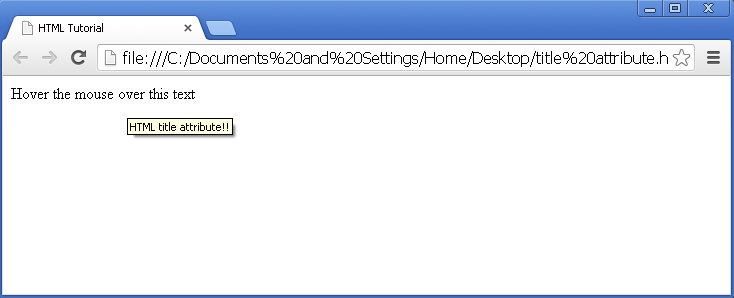
The title attribute:
The title attribute gives the title to the HTML element. The title given to an element will be displayed when we hover (point) the mouse over that element.
This attribute is used to convey additional information to the user, if any.
In HTML5 you can apply this attribute on any element, but in HTML 4.01 you cannot apply this attribute on,
Ø Base
Ø Head
Ø Html
Ø Meta
Ø Script
Ø Style
Ø title
Ø Param
Syntax for title attribute:
<Element_name title=”title of the element”>Content</Element_name>
Example for title attribute:
<html>
   <head>
      <title>HTML Tutorial</title>
   <body>
      <p title="HTML title attribute!!"> Hover the mouse over this text
      </p>
   </body>
</html>
The output of the above program would be:
Apart from the above, we also have the following global attributes:
Attribute | Options | Purpose |
width | Numeric value | Specifies width of images, tables or table cells |
height | Numeric value | Specifies width of images, tables or table cells |
background | URL | Places a background image behind that element specified in the URL |
bgcolor | Numeric, hex-decimal, RGB values | Colors the background of that element |
align | right, left, center | Aligns the element horizontally |
valign | top, middle, bottom | Aligns the element horizontally |
dir | ltr (default), rtl | Indicates the direction of text, left to right or right to left |
xml:lang | Any ISO-639 language code | Sets language option for XHTML. Same as attribute lang in HTML |
EVENT ATTRIBUTES:
Event attributes of HTML are used when we want to perform some action when the user interacts with the web page by clicking the mouse or by pressing a key etc.
These attributes tell the browser what to do, when a particular event is triggered.
We use event attributes while programming with JavaScript.
There are different types of Event attributes. They are:

Here is the list of different types of event attributes:
Attributes for Keyboard events:
These attributes are used when the user performs an action using keyboard
Attribute | Input value | Action |
onkeydown | Script | Performs the specified action when user is pressing a key |
onkeypress | Script | Performs the specified action when user presses a key |
onkeyup | Script | Performs the specified action when user releases a key |
Attributes for Form Events:
These attributes are used to perform a specified action inside a HTML form.
Attribute | Input value | Action |
onfocus | Script | Gets activated when the element is focused |
onselect | Script | Gets activated when some text is selected |
onsubmit | Script | Gets activated when the form is submitted |
onblur | Script | Gets activated when the element loses the focus |
onchange | Script | Gets activated when the value of an element is changed |
onformchange | Script | Script to be activated when a form is changed |
oninvalid | Script | Script to be run when an element is invalid |
oninput | Script | Script to be run when an element gets user input |
onforminput | Script | Script to be run when a form gets an input |
oncontextmenu | Script | Script to be run when context menu is triggered |
onreset | Script | Activates when the reset button is pressed (not supported in HTML5) |
Attributes for Mouse events:
These attributes are used when a user performs an action using mouse.
Attribute | Input value | Action |
onmousedown | Script | The pointing device button has just been pressed. |
onmouseup | Script | The pointing device button has just been released. |
onmouseover | Script | The pointing device enters the bounds of an element from outside the element. |
onmousemove | Script | The pointing device was moved within the boundary of the element. |
onmouseout | Script | The pointing device was moved out of the boundary of the element. |
onmousewheel | Script | Triggered when the mouse wheel button is rotated. |
onclick | Script | Activates on a mouse click on an element |
ondbclick | Script | Activates on a mouse double-click on an element |
ondrag | Script | Script to be run when an element is dragged |
ondragend | Script | Script to be run at the end of drag |
ondragenter | Script | Script to be run when an element has been dragged to a valid drop target |
ondragleave | Script | Script to be run when an element leaves a valid drop target |
ondragover | Script | Script to be run when an element is being dragged over a valid drop target |
ondragstart | Script | Script to be run when drag operation is initiated |
ondrop | Script | Script to be run when dragged element is dropped |
onscroll | Script | Script to be run when an element’s scroll bar is scrolled. |
Attributes for Media Events:
These attributes are used while handling media elements like videos, images, audios etc.
Attribute | Input Value | Description |
onabort | Script | Script to be run on abort |
oncanplay | Script | Script to be run when a file is ready to start playing (when it has buffered enough to begin) |
oncanplaythrough | Script | Script to be run when a file can be played all the way to the end without pausing for buffering |
ondurationchange | Script | Script to be run when the length of the media changes |
onemptied | Script | Script to be run when something bad happens and the file is suddenly unavailable (like unexpectedly disconnects) |
onended | Script | Script to be run when the media has reach the end (a useful event for messages like "thanks for listening") |
onerror | Script | Script to be run when an error occurs when the file is being loaded |
onloadeddata | Script | Script to be run when media data is loaded |
onloadedmetadata | Script | Script to be run when meta data (like dimensions and duration) are loaded |
onloadstart | Script | Script to be run just as the file begins to load before anything is actually loaded |
onpause | Script | Script to be run when the media is paused either by the user or programmatically |
onplay | Script | Script to be run when the media is ready to start playing |
onplaying | Script | Script to be run when the media actually has started playing |
onprogress | Script | Script to be run when the browser is in the process of getting the media data |
onratechange | Script | Script to be run each time the playback rate changes (like when a user switches to a slow motion or fast forward mode) |
onreadystatechange | Script | Script to be run each time the ready state changes (the ready state tracks the state of the media data) |
onseeked | Script | Script to be run when the seeking attribute is set to false indicating that seeking has ended |
onseeking | Script | Script to be run when the seeking attribute is set to true indicating that seeking is active |
onstalled | Script | Script to be run when the browser is unable to fetch the media data for whatever reason |
onsuspend | Script | Script to be run when fetching the media data is stopped before it is completely loaded for whatever reason |
ontimeupdate | Script | Script to be run when the playing position has changed (like when the user fast forwards to a different point in the media) |
onvolumechange | Script | Script to be run each time the volume is changed which (includes setting the volume to "mute") |
onwaiting | Script | Script to be run when the media has paused but is expected to resume (like when the media pauses to buffer more data) |
Window Event Attributes:
These attributes are used when we want to perform an action according to the interaction of user with the window.
Attribute | Input Value | Description |
onafterprint | Script | Script to be run after the document is printed |
onbeforeprint | Script | Script to be run before the document is printed |
onbeforeunload | Script | Script to be run before the document is unloaded |
onerror | Script | Script to be run when an error occur |
onhaschange | Script | Script to be run when the document has changed |
onload | Script | Fires after the page is finished loading |
onmessage | Script | Script to be run when the message is triggered |
onoffline | Script | Script to be run when the document goes offline |
ononline | Script | Script to be run when the document comes online |
onpagehide | Script | Script to be run when the window is hidden |
onpageshow | Script | Script to be run when the window becomes visible |
onpopstate | Script | Script to be run when the window's history changes |
onredo | Script | Script to be run when the document performs a redo |
onresize | Script | Fires when the browser window is resized |
onstorage | Script | Script to be run when a Web Storage area is updated |
onundo | Script | Script to be run when the document performs an undo |
onunload | Script | Fires once a page has unloaded (or the browser window has been closed) |
In the next chapter, we will learn about HTML Headings.