
In C++ programming language, all statements are executed sequentially from the top to the bottom. However, you can change the order (flow) of statements. Control flow structures allow you to alter the flow of the statements. Thus, you can develop complex programs that depict real world situations. In C++, you can alter the flow of statements in the following ways:
- You can repeat a set of statements a specified number of times. For more information, see Loop Structure.
- You check if a condition is true or false. Based on the result, you can execute a statement or a set of statements. For more information, see Conditional Structure.
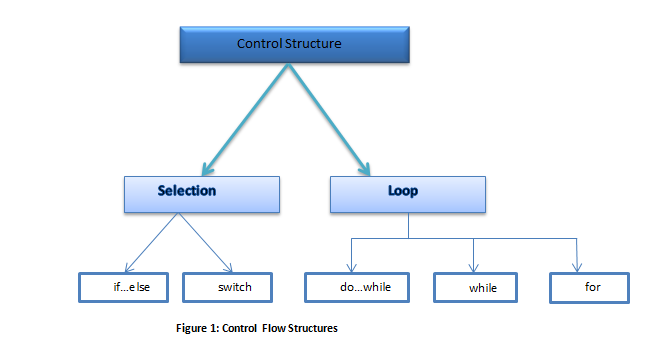
10.1 Conditional Branching
In conditional branching, you test a condition and based on whether the condition is true or false you execute a statement or set of statements. In C++ programming language, you can implement conditional branching using the following statements:
- Simple if statement
- If….Else Statement
- switch…case statement
10.1.1 Simple If Statement
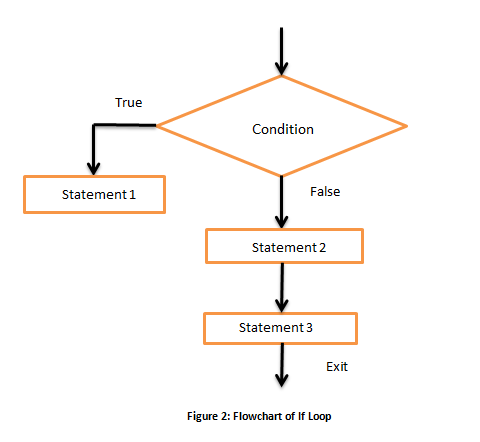
When you use the “if “statement, you check a condition. If the condition is met (true), a piece of code is executed. However if the condition is false, the piece of code in the loop body is skipped.
The syntax for using the “if” statement is as follows:
if (condition)
{
    Statement 1;
}
Statement 2;
Statement 3;
If the condition is true, the compiler executes statement1. If the condition is false, statement1 is skipped, and the compiler transfers control to statement2.
Let’s say, in your program, you need to make sure that the age of the user is not greater than 60.
int main()
{
    int age;
    age = 70;
    if (age>60)
{
         cout<<”Incorrect age”<<endl;
}
    return 0;
}
The output of the above program is as follows:
Incorrect age
Now, let’s store a value that is less than 70:
int main()
{
        int age;
        age = 34;
        if (age>60)
{
            cout<<”Incorrect age”<<endl;
}
        return 0;
}
The above program doesn’t display anything on the screen. This because the “if” condition is false (34 is not greater than 60) so the cout statement in the “if” block is skipped.
10.1.3 If….Else Statement
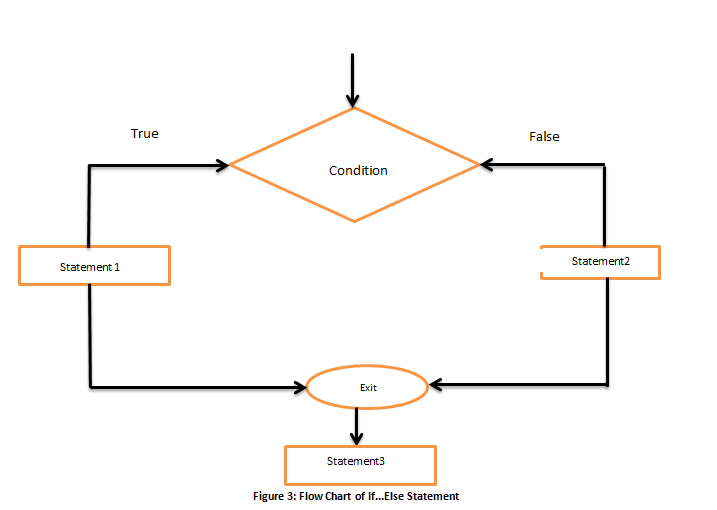
The “if…else” statement is an enhanced version of the “if” statement. In this, you specify what should be done in both cases - when a condition is true, and when the condition is false. It’s similar to the following real world statements:
- If you maintain your car you’ll get a good mileage, else you won’t
- If you score above 50% you pass, else you fail
In essence, the “if…else” structure tells the compiler what to do when a condition is met (true) and when the condition is not met (false). Whereas, the “if” structure only specifies what the compiler must do when the condition is met (true).
The syntax for using the “if…else” structure is as follows:
if (condition)
{
        Statement 1;
}
else
{
        Statement 2;
}
Statement 3;
Let’s enhance the example of the “if” statement. Now, when the condition (age< 60) is true we display the message “correct age”, and when the condition is false we display the message “incorrect age”:
int main()
{
    int age;
    age = 70;
    if (age<=60)
    {
        cout<<”Correct age”<<endl;
    }else
    {
        cout<<”Incorrect age”<<endl;
    }

    return 0;
}
Following is the output of the above program:
Incorrect age
Understanding the statements of the program:
- The variable age is initialized to 70.
- Next, the condition age<=60 is not met, that is, the condition is false (70<60)
- Hence, the statement in the else block is executed and “incorrect age” is displayed on the screen.
Now, let’s initialize the age variable to a value less than 60. The C++ program is as follows:
int main()
{
    int age;
    age = 34;
    if (age<=60)
    {
        cout<<”Correct age”<<endl;
    }
    else
    {
        cout<<”Incorrect age”<<endl;
    }
    return 0;
}
The output of the above program is as follows:
Correct age
Understanding the statements of the program:
- The variable age is initialized to 34.
- Next, the condition (age<=60) is met, that is, the condition is true (34<60); hence, the statement in the “if” block is executed and “correct age” is displayed on the screen.
Let’s look at another example of conditional control structure. In this example, you need to compare two numbers that the user enters, and display a message specifying which one is greater. The C++ program is as follows:
int main()
{
    int x, y;
    cout<<”Enter the first number”<<endl;
    cin>> x;
    cout<<”Enter the second number”<<endl;
    cin>>y;
    if (x>y)
  {
         cout<<”The first number is greater than
          second”<<endl;
    }else
    {
        cout<<”The second number is greater than first”<<endl;
    }
    return 0;
}
Understanding the statements of the program:
- The variable x stores the first number and the variable y stores the second number.
- If x>y, the statement in the “if” block is executed
- If y>x , the statement in the “else” block is executed
10.1.5 Switch…Case Construct
The “switch…case” statement tests the value of an expression against a list of conditions. When a match is found, the statements associated with that condition are executed. In the case of a “switch…case” statement, the conditions are constants. Each constant is a “case” (in the body of the “switch….case” statement).
The Syntax for using the “switch…case” statement is as follows:
switch(expression)
{
        case1;

               Block-of Statements1;

        case2:

               Block-of Statements2;

        case3:

               Block-of Statements3;

        default:

               Block-of Statements4;
}
    Statement5;
- The body of each “switch…case” structure has a “default” case. The statements associated with this case are executed when the value of expression doesn’t match any case in the “switch” body.
10.1.6 Switch…case Construct Example
Let’s write a program in C++ using the “switch…case” construct:
void  main()
{
    char i;
    cout<<”Enter a rainbow colour VIBGYOR”<<endl;
    cin>>i;
    switch(i)
    {
        case ‘V’:
            cout<<”Voilet”<<endl;
            break;
        case ‘I’:
            cout<<”Indigo”<<endl;
            break;
        case ‘B’:
            cout<<”Blue”<<endl;
            break;
        case ‘G’:
            cout<<”Green”<<endl;
            break;
        case ‘Y’:
            cout<<”Yellow”<<endl;
            break;
        case ‘O’:
            cout<<”Orange”<<endl;
            break;
        case ‘R’:
            cout<,”Red”<<endl;
            break;
        default:
            cout<<”You have entered the wrong                                  color”<<endl;
    }
}
Understanding the Statements of the Program:
In the above program, you want the user to enter one of the following characters:
- V
- I
- B
- G
- Y
- O
- R
- Each of the above characters forms a case in the body of the “switch…case” statement. The value entered by the user is evaluated against these cases. When a match is found, the statements associated with that case are executed.
Let’s say the user enters the character ‘V’. This character is stored in the variable i. Next, the value of the variable i is evaluated against the cases in the “switch” body. The value of i matches the first case; hence, the statements associated with the first case (case ‘V’) are executed. Thus, the output of the program is – Violet.
Let’s say the user enters the character B. In this case, the output of the above program is –Blue.
- The “default” case: is executed when no match is found. In the above program, let’s say the user enters the character “T”. Now, T doesn’t match any of the cases listed in the “switch” body. So, the default case is executed. Thus, the output of the program is as follows:
You have entered the wrong color
- The “break” Statement: To exit the “switch” body, you use the “break” statement. This causes the control to be transferred to the statement following the end of the “switch…case” construct.
In the above program, each case has a break statement. This is because, once a match is found, you wouldn’t want to execute the other statements in the “switch” body. However, the “default” case doesn’t have a break statement. This is because, in the above program, default is the last statement of the “switch” body. Thus, after its execution the control is automatically transferred to the statement following the “switch…case” construct.
10.2 Loop Structure
A loop structure repeats a piece code as many times as you want. Let’s say you want to print your name 5 times on the screen. You can either write 5 cout statements or use a loop structure. The advantage of using a loop structure is that you would just need to write the cout statement once and the loop structure will execute the cout statement 5 times.
When you want to use a loop structure, you must specify a loop condition. This is needed so that loop doesn’t continue to execute indefinitely.
The C++ loop structures are as follows:
10.3 While Loop
For as long as the loop condition is true, the “while” loop continues to execute. When the condition becomes false it stops looping, and the compiler transfers the control to the statement immediately following the loop. In the “while”, the loop condition is checked before the first iteration of the loop.
The Syntax for using the “while” loop is as follows:
while (condition is true)
{
        Statement1;
}
Statement 2;
10.4 While Loop Example
Let’s look at an example:
int main()
{
        int x=0;
        while(x<=5)
        {
            cout<<x<<endl;
        }
        return 0;
}
In the above program the loop continues to execute indefinitely. This is because the loop condition never becomes false. The value of x is always 0.
In order for the loop to stop executing and the loop condition to become false, you need to increment the value of x. A C++ program that illustrates this is as follows:
int main()
{
        int x=0;
        while(x<=5)
        {
            cout<<x<<endl;;
            x=x+1;
        }
        return 0;
}
The output of the above program is as follows:
0
1
2
3
4
5
Understanding the statements of the above program:
- The variable x is initialized to zero
- Next, the loop condition requires to repeat the loop till the value of x=5
- Each time the loop executes, the cout statement prints the value of x on screen. In addition, the statement x=x+1, increments the value of x by 1. This statement is required so that the value x becomes greater than 5 and the loop condition becomes false.
The “do… while” loop construct is similar to the “while” loop. The only difference between the two is that the “do…while” loop executes the loop once and then evaluates the loop condition, whereas the “while” loop evaluates the loop condition first. Therefore, even when the loop condition is false, the “do… while” loop will execute at least once but the while loop will not.
The Syntax for using the “Do…While” loop is as follows:
int main()
{
        int x=0;
        while(x<=5)
        {
            cout<<x<<endl;;
            x=x+1;
        }
        return 0;
}
The statement1 is executed for as long as the loop condition is true. When the loop condition becomes false, the control is transferred to the statement2. However, you must remember that statement1 is executed once even when the loop condition is false.
10.6 Do…While Loop Example
Let’s rewrite the above program using the “Do…While” loop:
int main()
{
        int x=0;
        do
        {
            cout<<x<<endl;
            x=x+1;
        }while(x<=5)
        return 0;
}
The output of the above program is as follows:
0
1
2
3
4
5
Understanding the statements of the above program:
- The variable x is initialized to zero
- The loop executes, and the cout statement prints the value of x on screen. In addition, the statement x=x+1, increments the value of x by 1.
- After the first execution, the loop condition is evaluated. Now, the value of the variable x is 1. So the condition x<=5 is true and the loop continues to execute till the value of x becomes 6.
- When the value of the variable x is 6 the loop condition is not met, and the control is transferred to the “return 0” statement.
10.6.1 Difference between While and Do…While with Example
Let’s write a program in which the loop condition is not met (false) even once.
While Loop | Do…While Loop |
int main() { int x=6; while(x<=5) { cout<<x<<endl; x=x+1; } return 0; }
| int main() { int x=6; do { cout<<x<<endl; x=x+1; }while(x<=5) return 0; } |
- The program written using the “while” loop doesn’t display anything on the screen. This is because the loop condition (x<=5) is evaluated before the execution of the loop. In the above program, the loop condition is false (6<=5).
- The program written using the “Do…While” loop construct displays “6” on the screen once. This is because even though the loop condition is false (the variable x is initialized to 6(value that is greater than 5). The loop condition is evaluated after the statements in the loop are executed once. Thus, the cout statement is executed once and it displays the value of the variable x (which is 6) on the screen.
10.7 For Loop
A “for” loop, like other loop structures, executes a piece of code as many times as you want. You use a “for” loop when you know the number of times you want to execute a piece of code.
The Syntax for using the “for” loop is as follows:
for(initial value; condition; increment)
{
        Statement1;
}
Statement 2;
To understand the above syntax, let’s look at example. Let’s say that you want to repeat the “for” loop 5 times. For this, you need to specify the following information in the parenthesis of the “for” loop:
for(int x=0,x<5;x++)
- You declare and initialize a variable. You can refer to this as the loop variable. In the above example, x is the loop variable; you declare the variable x, and initialize it to 0.
- Next, you specify the loop condition. The loop continues to repeat till this condition is true.
- You specify the value you want to add to the loop variable in each loop repetition. In the above example, x++ is the same as writing x=x+1. Thus, each time the loop executes, the value of x is incremented by 1.
Thus, you specify the following three values inside the parenthesis of the “for” loop:
- Initial Value: It is the starting value of the loop iteration. To specify this value you need declare and initialise a variable.
- Condition: The loop continues to execute till this condition is true. When the condition becomes false, the compiler transfers the control to the statement following the loop.
- Increment: This is the value you add to the loop variable with each loop iteration
- Statement 1 is executed till the loop condition is true. When the condition becomes false the control is transferred to statement2.